

How to Solder Copper Pipes for a Permanent, Watertight Joint
About This Project
This guide provides comprehensive, step-by-step instructions for soldering copper pipes and fittings. The process involves meticulous preparation, cutting, cleaning, fluxing, heating, and applying solder to create a strong, permanent, and watertight seal essential for reliable plumbing systems.
Best for experienced DIYers and homeowners with some experience with basic plumbing knowledge and familiarity with power tools. Requires True Grip Large Tan Cowhide Leather Gloves 9323-26 and MCR Safety BearKat Safety Glasses MCSCRWBK110 and First Alert General Purpose Fire Extinguisher 1-A:10-B:C - in Red FE1A10GOA.
Tools & Materials
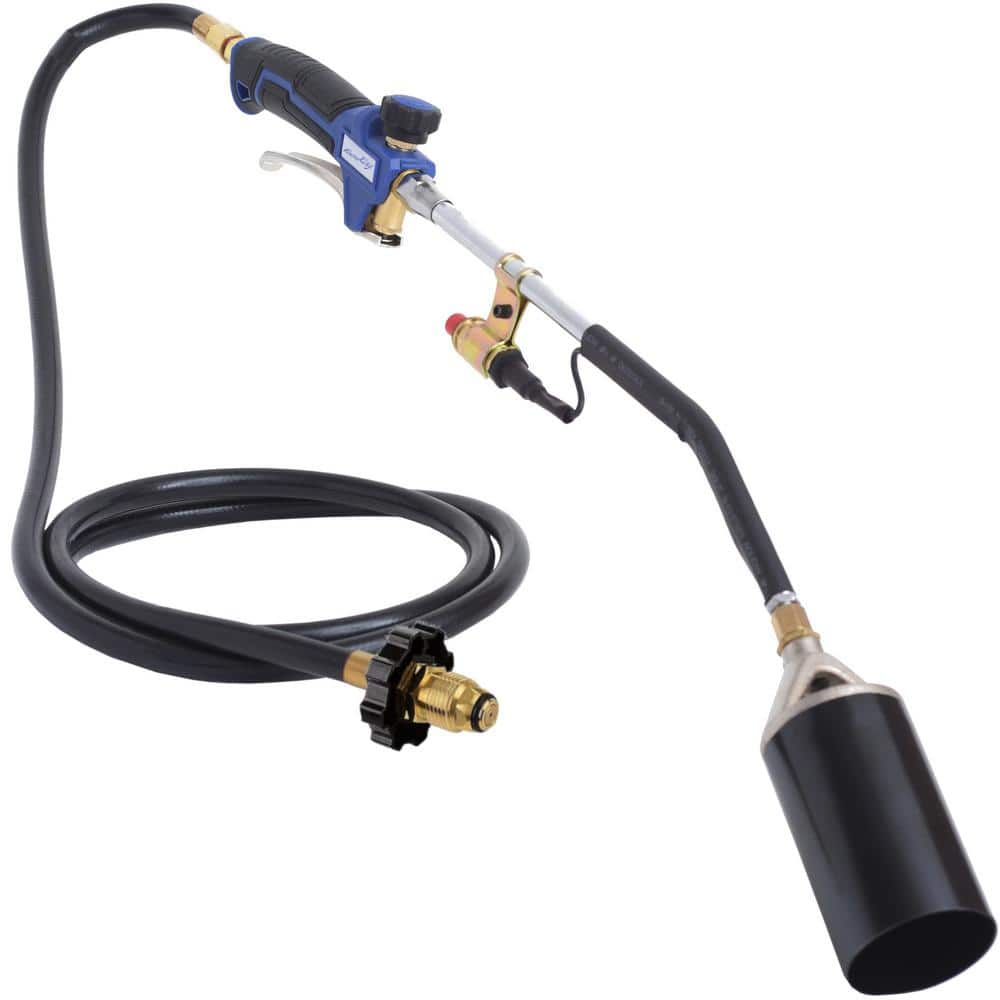
Flame King 340,000 BTU Propane Torch Self Igniting with Turbo Blast Trigger and Flow Valve YSN340K
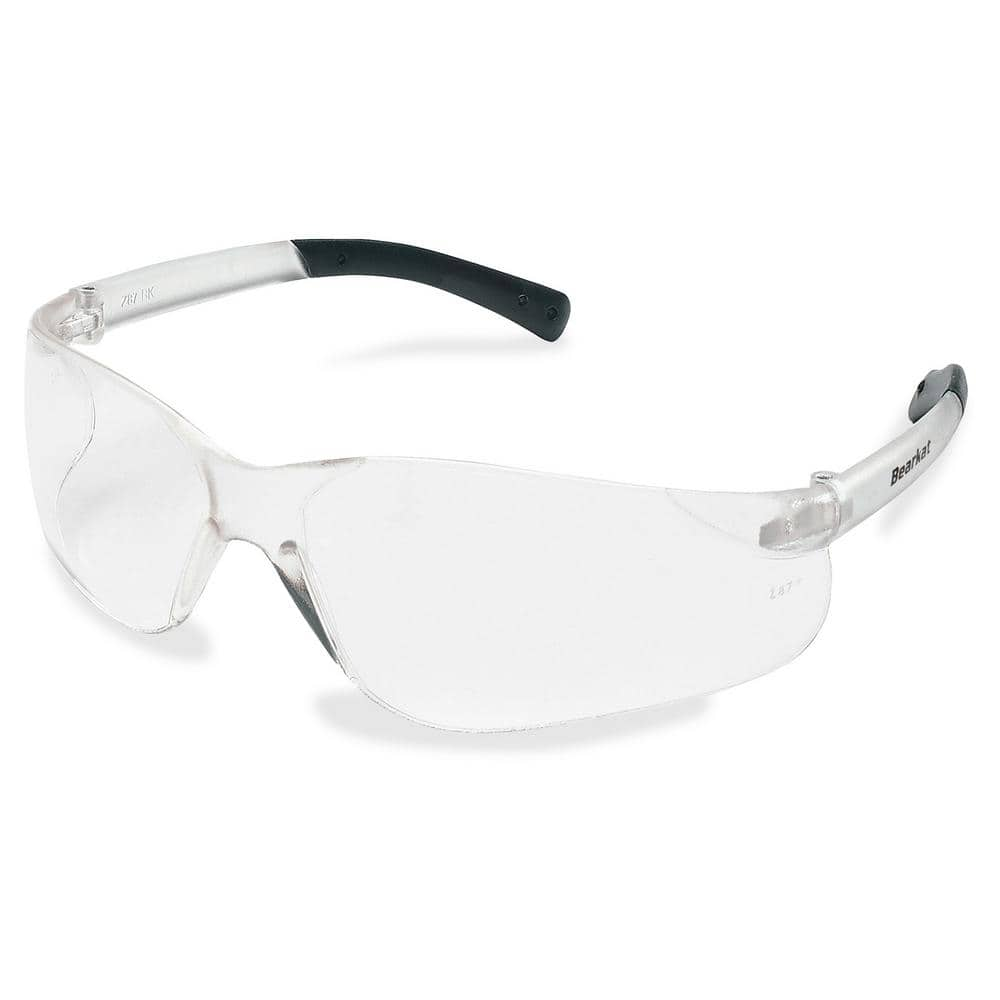
MCR Safety BearKat Safety Glasses MCSCRWBK110

True Grip Large Tan Cowhide Leather Gloves 9323-26

Kidde Pro 1-A:10-B:C Fire Extinguisher 21030922

AUTOCUT 1/2 in. Copper Pipe Tubing Cutter ATC12
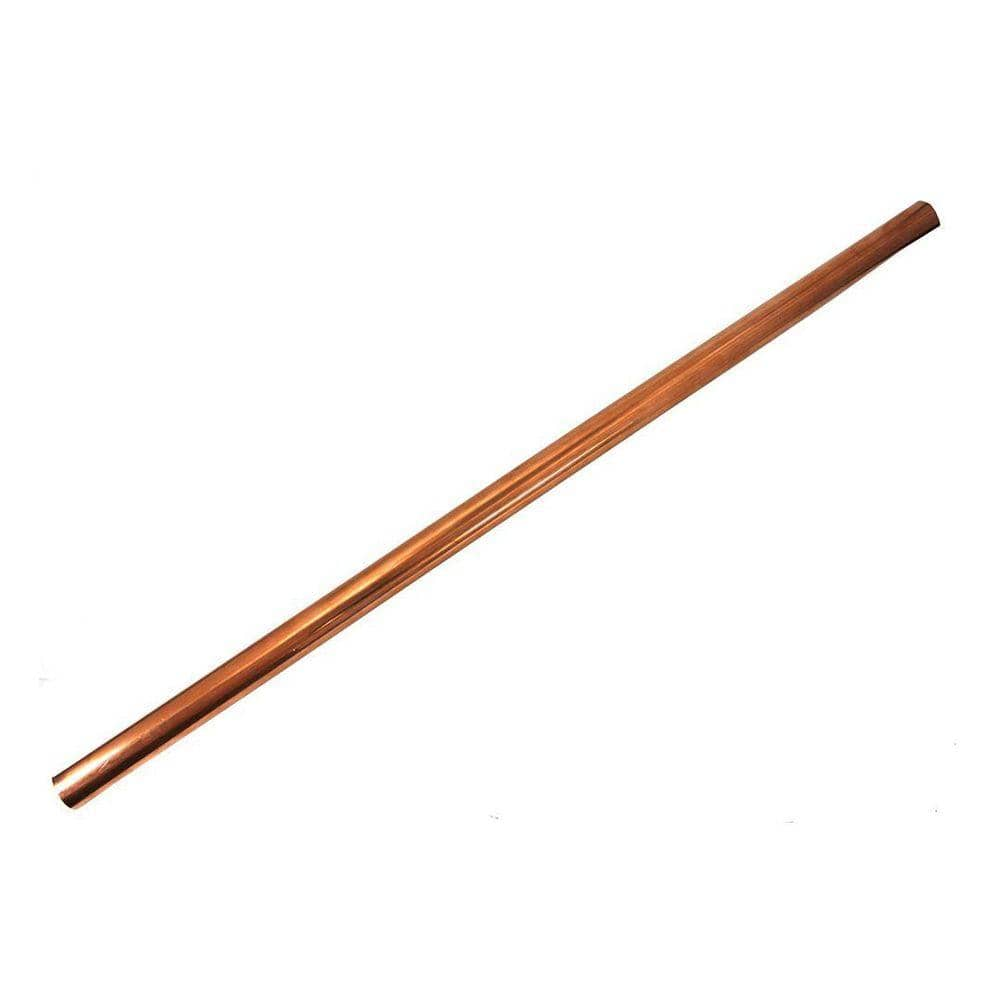
Cerro 1/2 in. x 5 ft. Copper Type L Hard Straight Pipe PSLE-500L005
Flame King 340,000 BTU Propane Torch Self Igniting with Turbo Blast Trigger and Flow Valve YSN340K
The YSN340K Propane Torch Burner by Flame King is perfect for many different uses; melting snow and ice, removing parking lot markings, paint removal, thawing frozen pipes and equipment, melting tar and
MCR Safety BearKat Safety Glasses MCSCRWBK110
Safety glasses feature a well thought-out construction that combines the best in safety, comfort and affordability. Your vision is unobstructed by the 1-piece wraparound lens which, by its tight fit, provides for maximum safety. Flexible temples enhance your comfort during extended use. Nonslip rubber head grips are notched for a clip-on breakaway cord.
True Grip Large Tan Cowhide Leather Gloves 9323-26
This glove is constructed of strong leather with a high level of abrasion resistance. It fits comfortably and snug to the wrist. The classic design allows superior movement and comfort.
Kidde Pro 1-A:10-B:C Fire Extinguisher 21030922
Having a fire extinguisher within reach can help you create a path to safety, and may even help put out a small, contained fire. This Kidde Pro 110 fire extinguisher is UL rated 1-A, 10-B:C and is ideal
AUTOCUT 1/2 in. Copper Pipe Tubing Cutter ATC12
Autocut copper tubing cutters are a great tool to have when you don't have enough swing room to use a full-size tubing cutter. You can cut copper tubing with less than one inch of clearance or you can
Cerro 1/2 in. x 5 ft. Copper Type L Hard Straight Pipe PSLE-500L005
The Cerro's 1/2 in. x 5 ft. Copper Type L Straight pipe is made of type L copper to be maintenance-free. This type of pipe is corrosion-resistant and noncombustible. It is ideal for general plumbing and
Steps

Preparation and Safety
10 minsBefore any work begins, ensure your safety and prepare the work area. Shut off the main water supply to the house or the branch line you are working on. Open the lowest faucet in the system and the faucet nearest to your work area to allow all water to drain completely from the pipes. Even a small amount of water in the pipe will prevent it from reaching soldering temperature. Clear the immediate area of any flammable materials. Lay down a flame shield if working near combustible surfaces like wood or drywall. Put on your safety glasses and leather gloves. Keep a fire extinguisher within arm's reach.

Cut the Copper Pipe
2 minsFor a proper fit and optimal solder flow, the copper pipe must be cut cleanly and squarely. Use a tubing cutter for this task. Place the cutter around the pipe at the desired cut location. Tighten the knob until the cutting wheel makes light contact with the copper. Rotate the cutter around the pipe, then tighten the knob about a quarter turn. Repeat this process of rotating and tightening until the cutter wheel cuts through the pipe. A tubing cutter ensures a burr-free, perfectly square cut.

Deburr and Clean the Joint
3 minsThis is the most critical step for a successful joint. First, use a deburring tool (often a triangular blade attached to the tubing cutter) to ream the inside of the cut pipe, removing the small lip or burr created during cutting. This ensures unrestricted water flow. Next, use a specialized pipe cleaning brush (or fitting brush) to clean the inside of the copper fitting until the surface is bright and shiny. Then, use sand cloth or a dedicated pipe cleaning tool to scour the outside of the pipe end (about 1 inch) until it is also bright, shiny, and free of any oxidation or dirt. Do not touch the cleaned surfaces with your bare hands, as skin oils can interfere with the soldering process.

Apply Flux
1 minUsing a small flux brush, apply a thin, even layer of water-soluble plumbing flux to the cleaned outside surface of the pipe end. Also apply a thin, even layer of flux to the cleaned inside surface of the fitting. The flux serves two purposes: it chemically cleans away any remaining oxides when heated and helps draw the molten solder into the joint through capillary action.

Assemble the Joint
1 minImmediately after applying the flux, assemble the joint. Push the pipe straight into the fitting until it bottoms out completely. Give the pipe a slight quarter-turn twist to ensure the flux is evenly spread across both surfaces. Wipe away any excess flux that squeezes out of the joint with a clean rag.

Heat the Joint
1 minUsing a spark lighter, ignite your propane or MAPP gas torch. Adjust the flame to have a bright blue inner cone about 1-2 inches long. Begin heating the joint by applying the flame to the middle of the fitting, not the pipe or the solder. The goal is to heat the fitting evenly so that it will melt the solder. Keep the flame moving constantly from one side of the fitting to the other to avoid overheating one spot. The flux will bubble and may smoke; this is normal. The copper will change color as it heats. A good indicator that the joint is nearly hot enough is when the flux stops bubbling and starts to look clear and wet.

Apply Solder
1 minWhile continuing to heat the fitting, unspool about 6-8 inches of lead-free solder. Briefly remove the flame and touch the tip of the solder to the joint seam on the side opposite of where you were just heating. If the fitting is at the correct temperature, the solder will melt instantly and be drawn into the joint by capillary action, completely filling the gap between the pipe and fitting. Continue feeding solder until a bright silver ring appears all the way around the joint seam. Once the seam is filled, remove the solder and the torch. Do not apply the flame directly to the solder.

Cool and Clean the Joint
5 minsAllow the newly soldered joint to cool down naturally for several minutes. Do not try to accelerate the cooling process by quenching it with water, as this can stress the joint and cause a hairline fracture, leading to a future leak. Once the joint is cool enough to touch, use a damp rag to wipe away all residual flux from the exterior of the pipe and fitting. Leftover flux is acidic and can corrode the copper over time.

Inspect and Test for Leaks
5 minsAfter all joints are completed and have cooled, it's time to test your work. Ensure all faucets that were opened are now closed. Go to the main water shutoff valve and turn it on very slowly, allowing the pipes to fill with water gradually. A sudden rush of water can cause a 'water hammer' effect. Once the system is pressurized, carefully inspect the new joint(s) for any signs of dripping or moisture. Run your finger around the seam to check for even the smallest leaks. If the joint is dry, your work is complete.
Common Problems
Joints fail to seal if solder isn't properly melted by the fitting's heat.
Solution: Heat the fitting, not the solder directly. The heat of the pipe and fitting should melt the solder.
Solder won't flow into the joint, leaving gaps.
Solution: The heat from the torch will draw the solder towards it. Keep the flame on the opposite side of where you apply the solder for best results.
Heat the brass flange primarily; the heat will transfer to the lead. Overheating the lead will cause it to melt away.
Solution: To avoid this issue: Be mindful of this warning and take appropriate precautions.
Joints fail to seal if solder melts from the torch flame.
Solution: The solder should melt on contact with the hot metal, not from the direct flame of the torch.
Be extremely careful when using a propane torch. Keep it away from flammable materials and always have a fire extinguisher nearby.
Solution: To avoid this issue: Be mindful of this warning and take appropriate precautions.
This is a critical step. Skipping or rushing the cleaning process is the most common cause of failed or leaky solder joints.
Solution: To avoid this issue: Be mindful of this warning and take appropriate precautions.
Dull copper prevents proper solder flow, leading to leaks.
Solution: The copper should be bright and shiny after cleaning. If it's still dull, continue sanding.
Frequently Asked Questions
What are the most critical safety precautions I must take when soldering copper pipes?
Always work in a well-ventilated area to dissipate fumes and keep a fire extinguisher or bucket of water nearby. Ensure no flammable materials are close to your workspace, as the torch flame can be intense. Wear safety gloves and eye protection to guard against heat, hot solder splashes, and open flames.
My solder isn't flowing smoothly into the joint; it's just beading up on the outside. What's wrong?
This usually indicates the pipe isn't hot enough or isn't evenly heated around the entire joint. The copper must reach the proper soldering temperature for capillary action to draw the solder in – the solder should melt when touched to the hot pipe, not directly by the torch flame. Also, ensure your pipes and fittings were thoroughly cleaned and properly fluxed, as contaminants prevent proper solder flow.
Why is meticulous cleaning and deburring of the pipes and fittings so crucial before soldering?
Meticulous cleaning and deburring are vital because solder needs clean, bare copper to adhere properly. Any dirt, corrosion, or burrs will prevent the solder from flowing completely into the joint via capillary action, leading to weak spots and potential leaks. This step ensures the solder creates a strong, permanent, and watertight seal.
The project lists a few torch options. Which type of propane torch is best for a beginner trying to solder copper pipes?
For a beginner, the Flame King Multi-Purpose Propane Torch with a Wide Pencil Head (YSNAX1-003) is often easier to control. Its broader, less intense flame heats the joint more gently and evenly, reducing the risk of overheating the copper. The High Intensity torch provides a faster, more focused heat, which can be challenging for those new to soldering.
I've completed the soldering and found a small leak during testing. How do I fix it?
To fix a small leak, you'll need to drain the pipe, then carefully reheat the joint thoroughly to melt out the old solder and separate the fitting. Clean both the pipe and fitting again meticulously with a brush and sandpaper, reapply flux, and then re-solder the joint. Do not simply try to add more solder without proper re-preparation, as this rarely creates a reliable, permanent fix.
You've rated this project as 'beginner'. What's the steepest part of the learning curve, and what should a beginner focus on most?
While the steps are straightforward, the 'steepest part' for beginners is mastering heat control and proper solder application. Focus on evenly heating the entire circumference of the joint until it reaches the correct temperature where the solder melts instantly when touched to the hot pipe, getting drawn in by the heat, not directly by the flame. Meticulous preparation and patience are key.
Are there any alternative methods to join copper pipes if I'm uncomfortable with soldering, even for a permanent connection?
Yes, there are solder-free alternatives like press-fit fittings (e.g., ProPress) or push-to-connect fittings (e.g., SharkBite). These methods offer quicker installation without a torch and are ideal for repairs in tight spaces or where open flames are prohibited. However, these fittings can be significantly more expensive per connection than traditional soldered joints.


