
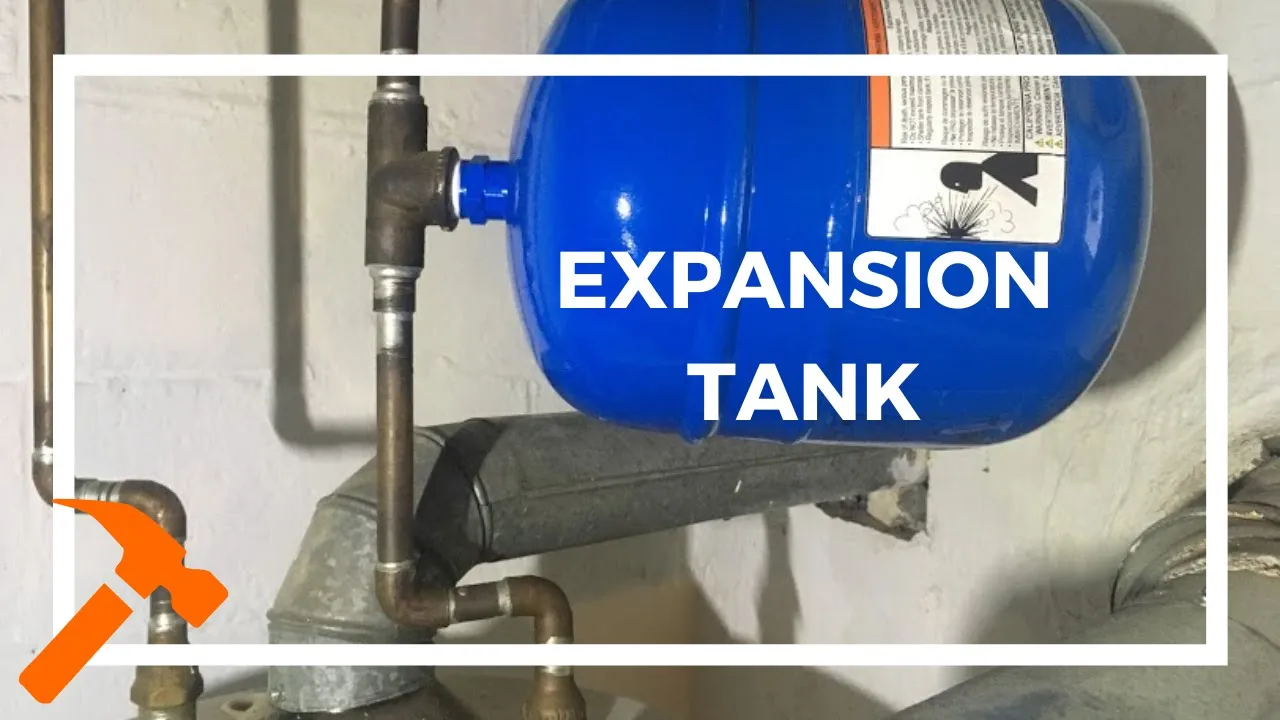
How to Replace a Water Heater Expansion Tank
About This Project
This guide provides comprehensive, step-by-step instructions for safely removing a failed or old water heater expansion tank and installing a new one. The process involves isolating the water heater from power and water supplies, relieving system pressure, removing the old tank, correctly preparing and installing the new tank, and then safely restoring the system to full operation while checking for leaks.
Best for experienced DIYers and homeowners with some experience with basic plumbing knowledge and familiarity with power tools. Requires EASTMAN 3/4 in. IPS Gas Pressure Test Gauge 0-30 psi 45167 and Watts 3/4 in. x 3/4 in. Brass FPT x FPT Natural Gas Shutoff Valve VAGV075K and GE Advanced Silicone 2 Caulk 10.1 oz Window and Door Sealant Clear 2811092.
Tools & Materials

The Plumber's Choice 1/2 in. Full Port PEX Barb Ball Valve Water Shut Off with Drain 12405PV
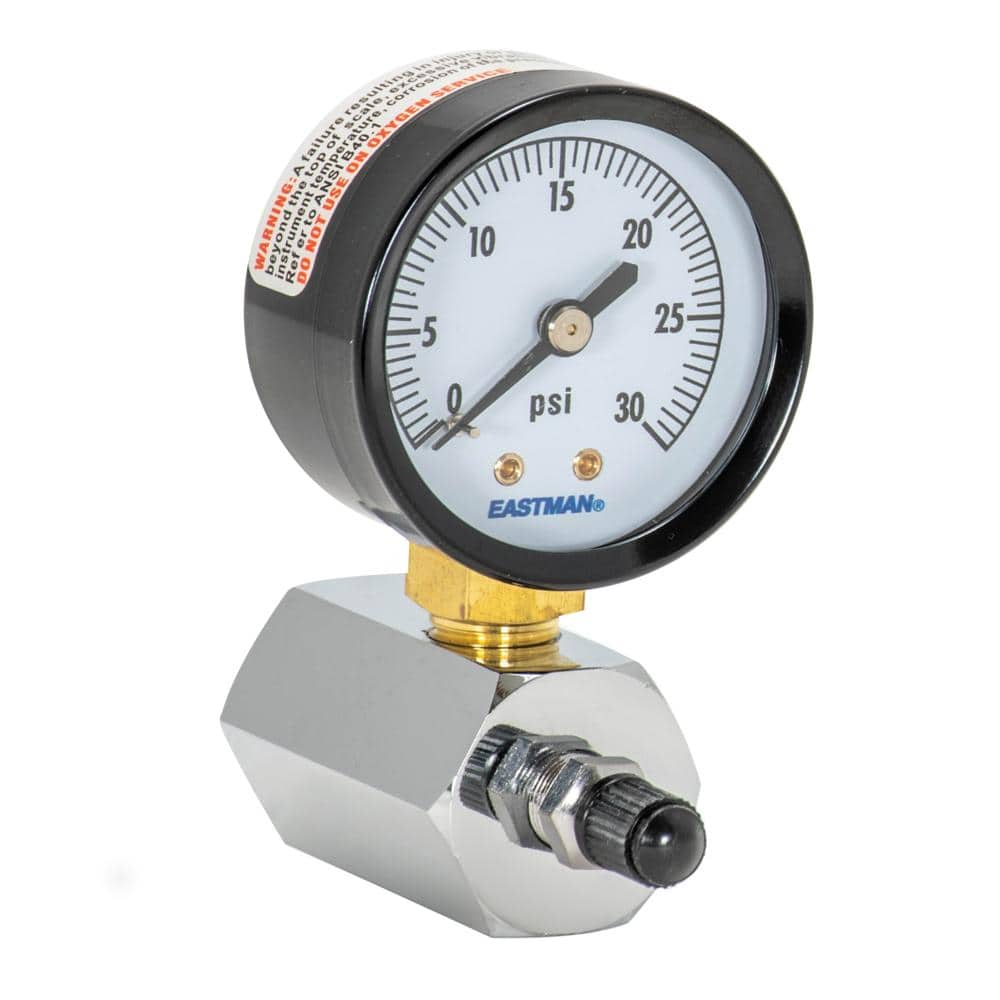
EASTMAN 3/4 in. IPS Gas Pressure Test Gauge 0-30 psi 45167
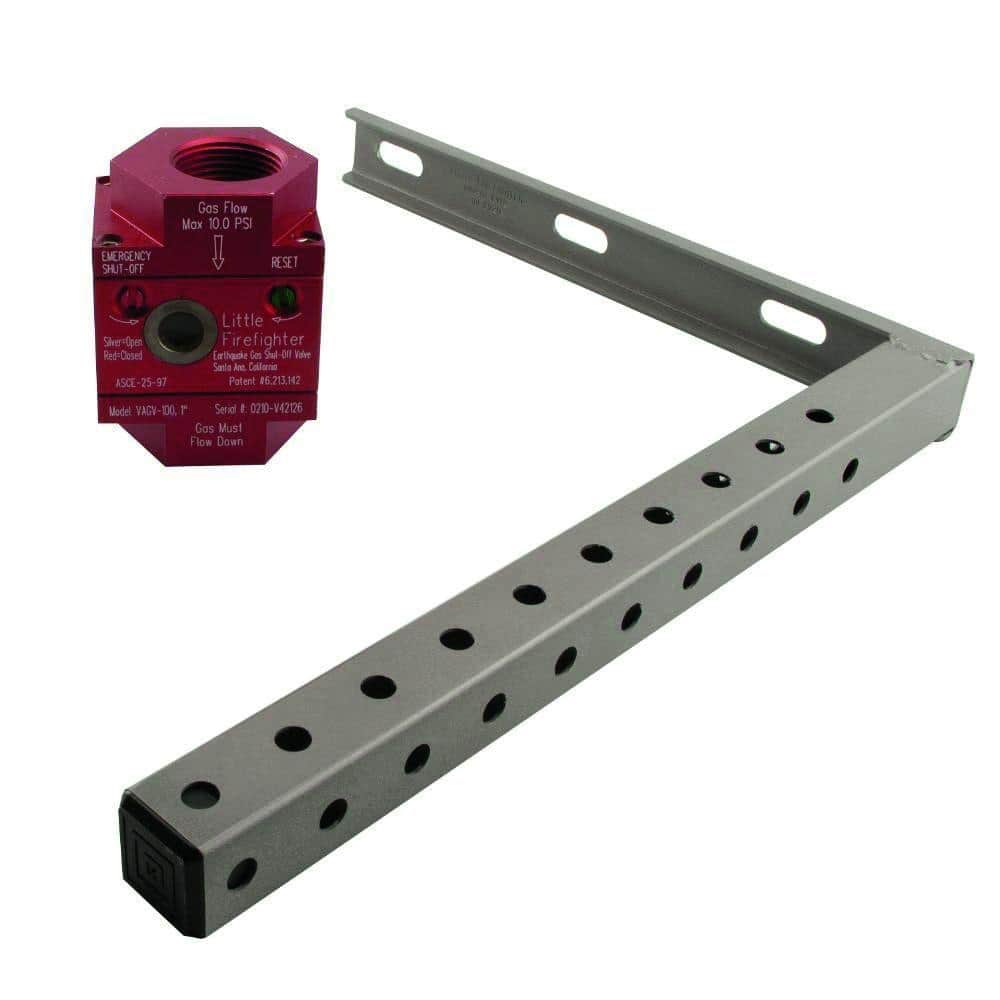
Watts 3/4 in. x 3/4 in. Brass FPT x FPT Natural Gas Shutoff Valve VAGV075K

GardenJoy PVC Garden Hose 5/8 in. x 50 ft. Heavy-Duty Durable Hose Outdoor Water Hose LG-GHB5850

Unger 6 Gal. Heavy-Duty Plastic Bucket DB02
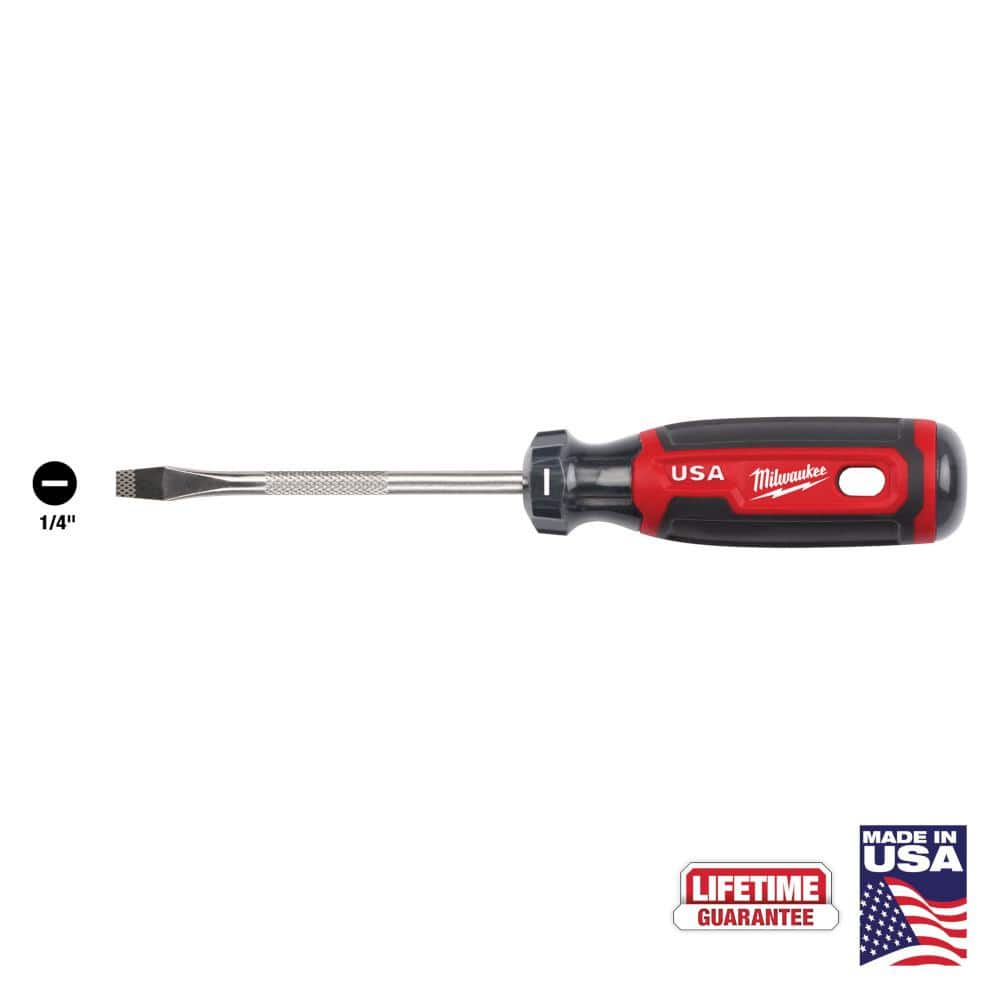
Milwaukee 4 in. x 1/4 in. Slotted Flat Head Screwdriver with Cushion Grip MT206
The Plumber's Choice 1/2 in. Full Port PEX Barb Ball Valve Water Shut Off with Drain 12405PV
The lead free full port PEX ball valve with Drain features PEX connections on both ends and is useful for heavy duty commercial and residential applications. Typical uses include domestic hot cold water
EASTMAN 3/4 in. IPS Gas Pressure Test Gauge 0-30 psi 45167
This Gas Pressure Test Gauge is a quality product to test gas pressures within a system. This gauge is easy to install, no tools are required. The gas pressure test gauge is made of steel and a shatter
Watts 3/4 in. x 3/4 in. Brass FPT x FPT Natural Gas Shutoff Valve VAGV075K
The Watts 3/4 in. x 3/4 in. Brass FPT x FPT Natural Gas Shutoff Valve reliably. Automatically turns off your gas supply line when triggered by a 5.4-magnitude seismic event. This durable valve incorporates
GardenJoy PVC Garden Hose 5/8 in. x 50 ft. Heavy-Duty Durable Hose Outdoor Water Hose LG-GHB5850
Light-weight and Flexible: Made from premium PVC, our garden hose is both light-weight and durable, allowing for easy handling without kinks or tangles, ideal for all your watering and cleaning needs.
Unger 6 Gal. Heavy-Duty Plastic Bucket DB02
The Unger 6-Gallon Heavy-Duty Professional Cleaning Bucket holds more than 6 Gal. of liquid. The bucket can accommodate a scrubber up to 14 in. L. This bucket features measurement marks and 2-pour spouts
Milwaukee 4 in. x 1/4 in. Slotted Flat Head Screwdriver with Cushion Grip MT206
The Milwaukee® 1/4" Slotted 4" Cushion Grip Screwdrivers (USA) are manufactured to give the professional the best-fitting screwdriver with max grip. These screwdriver tips are custom machined to deliver
Steps
Isolate the Water Heater
10 minsThe first and most critical step is to make the work area safe. Go to your home's main electrical panel and locate the circuit breaker labeled for the 'Water Heater'. Flip this breaker to the 'OFF' position. If you have a gas water heater, turn the gas control dial on the unit to 'OFF' and close the manual gas shut-off valve on the supply pipe. Next, find the cold water pipe that enters the top of the water heater and turn the handle of the shut-off valve clockwise until it stops. This prevents new water from entering the tank while you work.

Relieve Pressure and Partially Drain Tank
15 minsTo prevent a large volume of water from spilling when you remove the tank, you must relieve the pressure in the system. Go to a nearby sink and open the hot water tap all the way. This will allow air to enter the system as it drains. Next, attach a standard garden hose to the drain valve located at the bottom of the water heater. Place the other end of the hose into a floor drain or a large bucket. Open the drain valve by turning its handle or using a flathead screwdriver. Let a few gallons of water drain out until the water level is below the expansion tank's connection point.

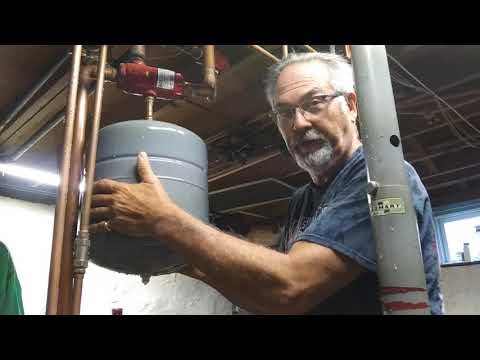
Remove the Old Expansion Tank
15 minsWith a bucket positioned underneath to catch water, firmly grip the old expansion tank with one hand to support its full weight. Use a large pipe wrench or a pair of channel-lock pliers on the metal fitting at the base of the tank. Apply steady pressure counter-clockwise to break the seal. Once it's loosened, you should be able to continue unscrewing it by hand. As you remove it, tilt it carefully to drain the remaining water into the bucket. Be aware that a failed tank can be completely full of water and surprisingly heavy.

Check and Adjust New Tank Pressure
10 minsBefore installing the new tank, you must ensure its internal air pressure matches your home's water pressure. Remove the plastic cap from the air valve on top of the new expansion tank. Use a standard tire pressure gauge to check the factory pre-charge. For this guide, we are assuming a target of 60 PSI. If the pressure is lower than 60 PSI, use a bicycle pump or an air compressor to add air until it reaches the correct pressure. If it's too high, gently press the pin in the center of the valve with a small screwdriver or the back of the gauge to release air. Re-check the pressure until it is accurate. Replace the valve cap once set.
Install the New Expansion Tank
10 minsPrepare the threads on the new expansion tank for a watertight seal. Take the roll of Teflon tape and, holding the tank with the threads facing you, wrap the tape clockwise around the threads. Use 3 to 4 full wraps, pulling the tape taut so it sinks into the grooves of the threads. Wrapping clockwise ensures the tape won't unwrap as you screw the tank in. Carefully lift the new tank and align its threads with the female fitting on the water pipe. Screw it in by hand for the first few turns to prevent cross-threading. Once it's hand-tight, use the pipe wrench to tighten it an additional 1 to 1.5 turns. The tank should feel snug and secure; do not overtighten.

Restore Water and Check for Leaks
15 minsBefore restoring power, you must refill the tank and check for leaks. First, make sure the drain valve at the bottom of the water heater is fully closed and the garden hose is removed. Go back to the sink where you opened the hot water tap and close it. Return to the water heater and slowly open the cold water supply valve by turning it counter-clockwise. You will hear water rushing into the tank. While it fills, keep your eyes on the new expansion tank connection. Once the tank is full (the rushing sound will stop), thoroughly dry the connection with a paper towel and watch closely for any sign of moisture or dripping. If a leak appears, turn off the water and tighten the connection another quarter-turn.

Reactivate System and Purge Air
15 minsWith the tank full and leak-free, you can complete the job. Return to the electrical panel and flip the water heater's circuit breaker back to the 'ON' position. For a gas heater, follow the manufacturer's instructions printed on the tank to relight the pilot light and turn the gas control knob to 'ON'. To purge any remaining air from the system, go back to the hot water faucet you used earlier and open it fully. It will likely sputter and spit air for a minute. Let it run until a smooth, steady stream of water flows out, then turn it off. The water heater will now begin heating the water. Your expansion tank replacement is complete.
Common Problems
If the new tank has no air pressure, it may be defective. It either has a leak or was not filled at the factory.
Solution: To avoid this issue: Be mindful of this warning and take appropriate precautions.
Expansion tank loses pressure, leading to water hammer and premature failure.
Solution: Pressure tanks should be checked for correct air pressure at least once a year, or every six months for best practice.
Do not pressurize the tank with the main water supply turned on. Always turn the main water supply off and drain the water first, and be aware that water may spray out when you remove the Schrader valve cap.
Solution: To avoid this issue: Be mindful of this warning and take appropriate precautions.
Incorrect pre-charge pressure leads to pump damage and premature failure.
Solution: Correct pre-charge pressure is crucial for the proper operation and lifespan of the well pump.
Failure to turn off power to the unit before working on it can result in serious injury or death.
Solution: To avoid this issue: Be mindful of this warning and take appropriate precautions.
Risk of scalding or electrical shock by not turning off the water heater.
Solution: Some manufacturers may suggest leaving the unit on, but turning it off is the universally safer method.
Failure to shut off the gas supply can result in a dangerous gas leak, creating a fire and explosion hazard.
Solution: To avoid this issue: Be mindful of this warning and take appropriate precautions.
Frequently Asked Questions
What are the essential safety precautions I need to take before starting to replace my water heater expansion tank?
The most crucial steps are to completely shut off the power (gas or electricity) to your water heater and turn off the main water supply to your home. Additionally, relieve the pressure in the system by opening a hot water faucet and draining a small amount of water from the water heater's drain valve. This prevents scalding and flooding.
Do I need any special tools for this project, or will standard home tools suffice?
While some basic tools are common, a MaxxHaul 60 PSI Pressure Gauge is essential for correctly setting the new tank's pre-charge pressure to match your home's water pressure. You will also need two heavy-duty pipe wrenches (like KNIPEX or Crescent) to effectively loosen and tighten the tank connections without damaging pipes. Having these specific tools makes the job much easier and safer.
How long should a beginner expect this project to take, and is it truly a 'beginner' level DIY task?
For a beginner, this project typically takes between 1 to 3 hours, assuming you have all the tools and materials ready. It is considered a beginner-friendly plumbing task as long as you meticulously follow the step-by-step instructions, especially regarding safety and proper pressure adjustment. Patience and preparation are key to a successful outcome.
What's the most common mistake people make when installing a new expansion tank, and how can I avoid it?
The most common mistake is not correctly adjusting the new expansion tank's pre-charge air pressure to match your home's incoming water pressure. Use a pressure gauge to measure your home's cold water pressure and adjust the tank's air valve to match it before installation. An improperly charged tank won't function effectively and can lead to future issues.
Beyond the expansion tank itself, what other materials will I likely need, and what's the typical cost saving for DIY vs. hiring a pro?
You'll definitely need plumber's tape for sealing pipe threads, plenty of absorbent towels (like HDX or WYPALL) for spills, and a bucket (Unger 6 Gal. Heavy-Duty Plastic Bucket) to catch residual water. Doing it yourself can save you significantly on labor costs, potentially hundreds of dollars, as you only pay for materials and tool rentals if needed.
Does the new expansion tank need to be installed in a specific orientation (e.g., upright, inverted), or does it matter?
Most modern expansion tanks are designed to function effectively in various orientations – upright, sideways, or inverted – as long as they are properly supported. Always check the manufacturer's instructions for your specific tank model (e.g., Everbilt or Amtrol). If mounting horizontally or inverted, ensure it is securely braced to prevent stress on the piping.


