
How to Measure Bathroom Plumbing Rough-In Dimensions for a New Vanity
About This Project
This guide provides detailed, step-by-step instructions for accurately measuring and marking the wall for new plumbing rough-in locations for a bathroom vanity. The process involves determining the vanity's placement, and then using its specific dimensions to mark the precise locations for the drain pipe and the hot and cold water supply lines, ensuring they align with the new sink and faucet.
Best for experienced DIYers and homeowners with some experience with basic plumbing knowledge.
Tools & Materials

25 ft. Tape Measure

Level

Vanity Art 72 in. W x 21.5 in. D x 34 in. H Double Sink Bathroom Vanity in Tan with Black Limestone Top VA7072-DT-BT

ROOT CANDLES 4 in. x 4 in. Timberline Red Unscented Pillar Candle 34468

DEWALT 1-1/2 in. Stud Finder DW0150

LUMABASE Red Battery Operated 3D Wick Flame Taper Candles (Set of 4) 59704
25 ft. Tape Measure
Measure with precision and ease.
Level
Ensures surfaces are just right.
Vanity Art 72 in. W x 21.5 in. D x 34 in. H Double Sink Bathroom Vanity in Tan with Black Limestone Top VA7072-DT-BT
Vanity Art introducing a high quality poplar wood bath vanity with sink. It is the perfect blend of functionality and style for your home. This essential piece offers generous storage space, featuring
ROOT CANDLES 4 in. x 4 in. Timberline Red Unscented Pillar Candle 34468
For over 150-years, Root Candles has crafted candles of uncompromising quality in Medina, Ohio prompted by Amos Ives Root's passion for bees, beekeeping, and honey. Today, Root Candles still relies on
DEWALT 1-1/2 in. Stud Finder DW0150
This Center Sensor Stud Finder has a detection depth of 1-1/2 in. for wood and metal. Traditional stud sensors locate the edge of the stud, but our new product locates the center for a more efficient read, even when held at an angle. Plus, it is constantly calibrating to save time during use. An audible alert and directional LED arrows clearly notify you once the stud is located and you can easily mark the center of the stud with the center marking channel.
LUMABASE Red Battery Operated 3D Wick Flame Taper Candles (Set of 4) 59704
Add a touch of elegance to a special event or everyday home decor with the flickering glow of battery-operated 3D wick flame taper candles. This set of 4 red flameless candles have a pivoted flame-shaped
Steps

Gather Information and Tools
5 minsBefore you begin, gather all necessary tools and documentation. The most critical item is the specification sheet for your new vanity and sink. This document provides the precise dimensions you'll need. You will also need a reliable tape measure for all measurements, a level to ensure your horizontal and vertical lines are true, and a pencil or marker for marking the wall. If you are working on a wall with finished drywall, a stud finder can be very helpful for identifying where you can securely mount the vanity, although it is not strictly required for the plumbing measurement phase.

Establish Vanity Centerline
5 minsDetermine the total space allocated for the vanity. Measure this space and find its center point. Use a tape measure to measure the width of the space and divide by two to find the center. Mark this center point on the wall at a convenient height. Then, use your level to draw a light, plumb (perfectly vertical) line through this mark. This vertical line is your vanity's centerline and will be the primary reference for all subsequent horizontal measurements for the sink, drain, and water supplies.

Mark Vanity Height and Width
5 minsConsult your vanity specification sheet to find its finished height (including the countertop) and total width. Measure up from the finished floor and make a mark for the top of the vanity. Use your level to draw a light, horizontal line across the wall at this height. This helps you visualize the vanity's final position. Next, using your centerline as the reference, measure out half of the vanity's total width to the left and mark it, then repeat for the right side. This shows the cabinet's final footprint on the wall.

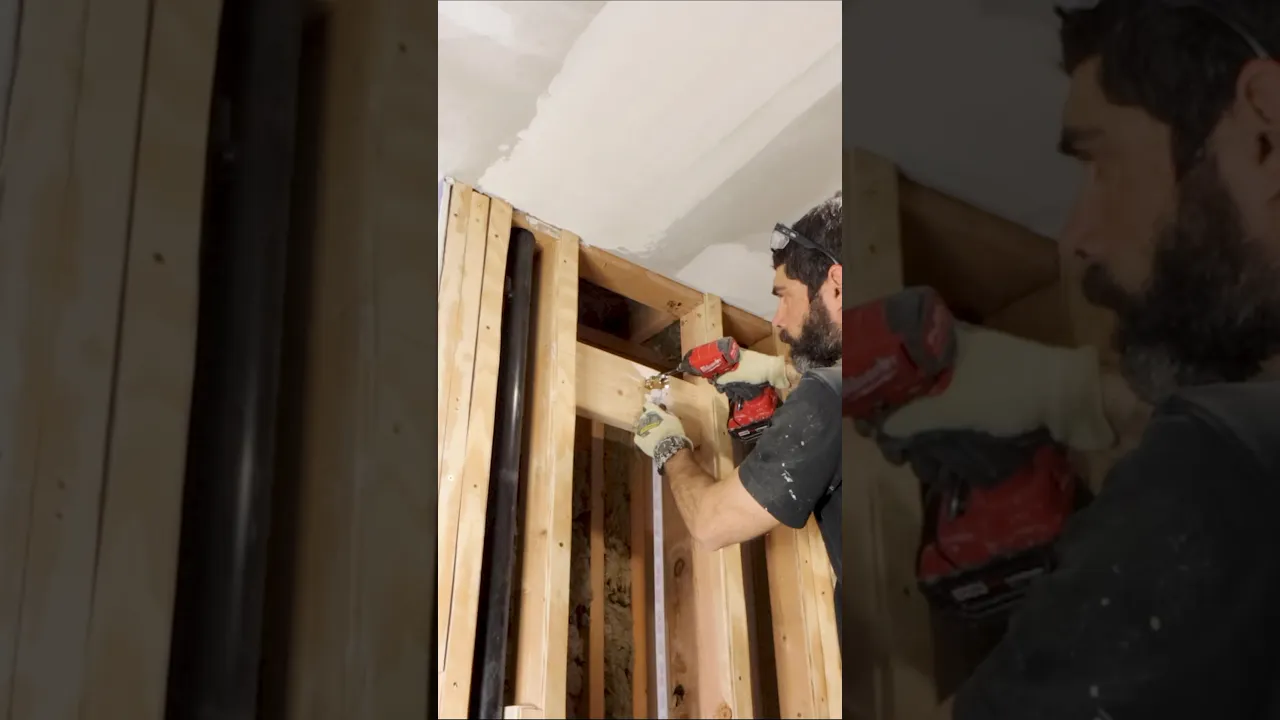
Locate and Mark the Drain Line
10 minsThis is a critical step. First, determine the drain's horizontal position. For a standard vanity, the sink drain is usually aligned with the main vanity centerline you already marked. Verify this with your spec sheet. Next, determine the vertical height. The goal is to position the drain stub-out from the wall so that a standard P-trap can be installed correctly. A common standard height for the center of the drain pipe is 18 to 20 inches from the finished floor. However, check your vanity's internal structure. If there is a drawer or shelf, you must position the drain stub-out to avoid it. The spec sheet may indicate a specific drain location. Mark the intersection of the drain's horizontal centerline and its vertical height. This 'X' is the target for the center of your drain pipe.

Locate and Mark Water Supply Lines
10 minsThe water supply lines (or stub-outs) feed the hot and cold water to the faucet. Standard practice places these lines several inches above the drain line to prevent interference. A typical height is 21 to 22 inches from the finished floor. For horizontal placement, they are typically spread apart to allow room for the shut-off valves and supply hoses. A common configuration is to place the cold water line 4 inches to the right of the sink drain centerline, and the hot water line 4 inches to the left of the centerline (creating an 8-inch spread between them). Hot is always on the left, and cold is on the right. Mark these two locations on the wall. Again, review the vanity spec sheet to ensure these locations do not conflict with drawers, shelving, or the sink basin itself.
Verify All Measurements
5 minsWith all your marks on the wall, take a final moment to verify everything. Stand back and look at the layout. Use your tape measure to re-check the drain height from the floor, the water line height from the floor, and the horizontal spacing of all three points from the main centerline. Hold the specification sheet up to the wall to visually confirm that your marks align with the diagrams. This final check is the most effective way to prevent a simple measurement error from turning into a major plumbing rework.
Common Problems
Vanity top is too high or too low if mounting strip is placed incorrectly.
Solution: Mark the mounting strip location 2 inches below the desired vanity top height.
Vanity won't be centered or securely mounted if studs aren't located correctly.
Solution: Studs are typically located 16 inches apart on center.
Can't reach mounting screws behind the sink.
Solution: A long Phillips screwdriver makes it easier to reach the mounting screws behind the sink.
Choose screws that are short enough to not extend through the inner walls of adjacent cabinets.
Solution: To avoid this issue: Be mindful of this warning and take appropriate precautions.
Vanity won't fit due to oversized framing.
Solution: Use support framing material that is no more than 1 1/2 inches thick.
Shower controls and fixtures are misaligned, requiring costly post-tiling fixes.
Solution: This quick check prevents the common issue of misaligned shower controls and fixtures, which is difficult to fix after tiling.
Toilet placement is off due to incorrect rough-in measurement.
Solution: The standard toilet rough-in from the finished wall is 12 inches. Adjust your measurement based on your specific toilet and bathroom layout.
Frequently Asked Questions
Is this project genuinely beginner-friendly, and can I expect to complete the measuring process within the estimated 3 hours?
Yes, this project is well-suited for beginners as it primarily involves careful measuring and marking, not actual plumbing installation. The 3-hour estimate is realistic, assuming you have all your tools and the new vanity's specifications readily available. Accuracy is more important than speed for this step.
Do I need the specific brand-name tape measures listed, or can I use a standard measuring tape and level?
While specific brands are listed for tools, any standard, accurate 25 ft. tape measure and a reliable 2-foot level will work perfectly. The critical factor is ensuring your tools are in good working order and provide clear, precise readings for accurate marking on the wall.
What are the most critical measurements to double-check to avoid costly errors during the rough-in process?
The most critical measurements are the vanity's centerline, the height and horizontal spacing of the drain pipe, and the hot/cold supply lines. Always double-check these against your new vanity's internal dimensions, especially where the sink basin, P-trap, and supply lines will connect, to ensure everything fits without obstruction.
Before marking the wall, should I take any precautions regarding existing pipes or electrical wiring that might be behind the drywall?
While you are only marking the wall, it's a good practice to use a stud finder with AC detection to identify potential electrical lines or hidden studs. This awareness can help you avoid marking directly over sensitive areas, which is beneficial if you later need to cut into the wall for actual plumbing work.
What if my new vanity doesn't come with clear diagrams for plumbing cut-outs or internal clearances?
If detailed diagrams are missing, you'll need to physically measure the internal dimensions of your new vanity, particularly the back panel, drawer clearances, and the exact location of the sink's drain opening. Pay close attention to where the P-trap and supply lines will enter the cabinet, then transfer these precise points to your wall.
How precise do my rough-in measurements need to be, and what happens if they're slightly off?
Precision is crucial; aim for measurements within 1/4 inch, especially for the drain's vertical and horizontal placement. Minor discrepancies can often be accommodated by flexible supply lines or P-trap offsets. However, significant errors may require adjusting the wall opening, purchasing specialized adapters, or even altering the vanity.


