
How to Install a Toilet Flange Extender After Tiling
About This Project
This guide provides comprehensive, step-by-step instructions for installing a toilet flange extender kit after new flooring, such as tile, has been installed. The process involves thoroughly cleaning the old flange, accurately measuring the required height extension, dry-fitting the extender, creating a waterproof seal with silicone, and securely fastening the extender to the subfloor. This ensures a proper foundation for reinstalling the toilet and prevents future leaks.
Best for homeowners and DIY enthusiasts with basic plumbing knowledge. Requires MCR Safety BearKat Safety Glasses MCSCRWBK110 and Heavy Duty Latex Gloves.
Tools & Materials
Putty knife
Afoxsos Black Cardboard Decorative Boxes with Lid 3-Pack SNPH003IN809
Rag
Mighty Mint Gallon (128 oz.) Rodent Natural Peppermint Oil Spray RG-128
ZEP 1 Gal. Fast 505 Degreaser Cleaner and Degreaser ZU505128

Unger 6 Gal. Heavy-Duty Plastic Bucket DB02
Putty knife
Spreads putty with its flat blade.
Afoxsos Black Cardboard Decorative Boxes with Lid 3-Pack SNPH003IN809
Keep your cherished photos and mementos safe with this elegant set of 3 black paperboard suitcases. These decorative cardboard storage boxes not only provide a stylish solution to tackle clutter but also
Rag
Handy for cleaning or wiping tasks.
Mighty Mint Gallon (128 oz.) Rodent Natural Peppermint Oil Spray RG-128
Might Mint Rodent Repellent spray is made with a high-strength concentration of peppermint essential oil - a proven effective deterrent for mice and other rodents. This Northwest peppermint in particular
ZEP 1 Gal. Fast 505 Degreaser Cleaner and Degreaser ZU505128
ZEP 128 oz. Fast 505 Industrial Cleaner and Degreaser help you easily remove grease, lubricants, oils and foods from most surfaces. It is a great cleaner for kitchens and garages and can be used on hard
Unger 6 Gal. Heavy-Duty Plastic Bucket DB02
The Unger 6-Gallon Heavy-Duty Professional Cleaning Bucket holds more than 6 Gal. of liquid. The bucket can accommodate a scrubber up to 14 in. L. This bucket features measurement marks and 2-pour spouts
Steps

Prepare and Clean the Existing Flange
20 minsFirst, put on your safety glasses and gloves. If old closet bolts are present, remove them by sliding them out of their slots. Use a putty knife to carefully scrape off all remnants of the old wax ring from the top and inside of the flange. Deposit the old wax into a bucket or onto a piece of cardboard for disposal. After removing the bulk of the wax, use rags, possibly dampened with a small amount of mineral spirits or a degreaser, to wipe the flange completely clean. The goal is a clean, dry, and debris-free surface for the sealant to adhere to.

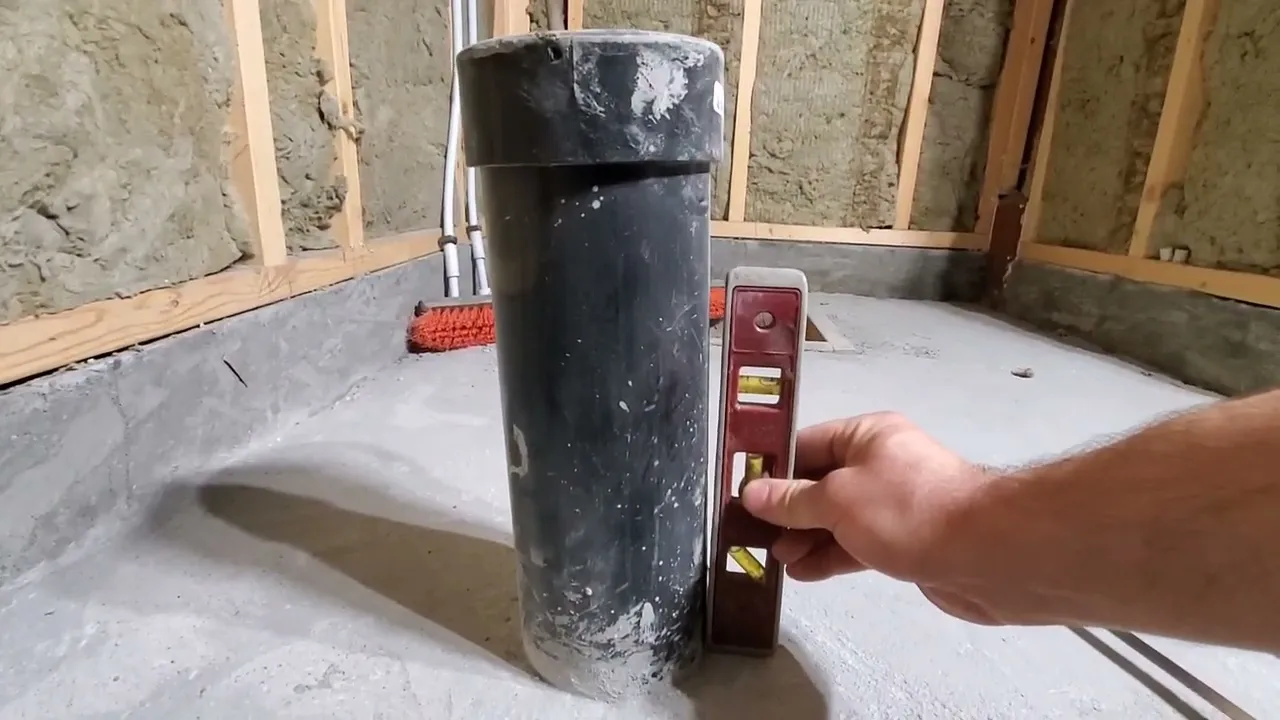
Measure Gap and Dry Fit Extender(s)
10 minsPlace a straightedge or level across the drain opening, resting on the finished tile floor. Use a tape measure to measure the vertical distance from the top of the existing flange to the bottom of the straightedge. This measurement determines the required thickness of your extender(s). Based on our assumed 1/2-inch gap, you will likely use one 1/2-inch extender or two 1/4-inch extenders. Place the selected extender(s) on the flange without any sealant. Check that the screw holes and closet bolt slots align properly with the holes and slots on the original flange.

Apply Silicone Sealant
5 minsAfter confirming the dry fit, remove the extender(s). Load the tube of 100% silicone sealant into the caulking gun. Apply a continuous, generous bead of sealant (about 1/4 to 3/8 inch thick) directly onto the clean top surface of the existing flange. If you are stacking two extenders, apply a similar bead of silicone to the top of the first extender before placing the second one on top.

Install and Secure the Flange Extender
15 minsCarefully place the flange extender onto the bead of silicone, pressing down firmly and evenly to spread the sealant. Align the screw holes and closet bolt slots with those on the flange below. Insert the long screws provided with the extender kit through the countersunk holes in the extender. Using a drill with a screwdriver bit or a manual screwdriver, drive the screws through the extender, through the original flange's screw holes, and securely into the wood subfloor below. Tighten the screws until they are snug, alternating between screws to apply even pressure. Do not overtighten.

Install New Closet Bolts and Wax Ring
5 minsTake the new, longer closet bolts (usually included in the extender kit) and slide the heads into the closet bolt slots on the topmost extender ring. Position them at the 3 o'clock and 9 o'clock positions, parallel to the back wall. Use the plastic retainer washers that came with the bolts to hold them upright and in place. Next, take the new wax ring and place it over the flange. Press down gently but firmly on the wax ring to create a slight seal against the top of the extender. This ensures it stays in place as you lower the toilet.

Final Cleanup and Preparation
5 minsUsing a rag or paper towel, carefully wipe away any excess silicone sealant that may have squeezed out from the sides of the extender. This provides a clean, professional finish. Allow the silicone to cure according to the manufacturer's instructions (typically 12-24 hours for a full cure) before subjecting the area to heavy use, although the toilet can generally be installed immediately. The flange is now at the correct height and is ready for the toilet installation to be completed.
Common Problems
Do not caulk the entire perimeter. Leaving a gap at the back is a critical step to allow water to escape if the wax ring fails, preventing undetected water damage.
Solution: To avoid this issue: Be mindful of this warning and take appropriate precautions.
Old sealant prevents a proper seal, leading to leaks.
Solution: Use a utility knife to carefully cut away any old sealant before cleaning the surface.
Uneven caulk bead and potential gaps if nozzle isn't pulled away.
Solution: For a thicker bead of caulk, pull the nozzle up and away from the surface as you apply it.
Messy caulk lines ruin the finished look.
Solution: Use painter's tape to create a clean caulk line if desired.
Toilet may leak if caulk isn't fully cured.
Solution: Let the caulk cure for at least 24 hours before exposing it to water.
Toilet flange might not seat properly without the twist.
Solution: The 'Twist-N-Set' design may require a slight twisting motion as you press down to help it set securely in the pipe.
Be careful not to dislodge the wax seal as you align the flange. Press straight down as much as possible.
Solution: To avoid this issue: Be mindful of this warning and take appropriate precautions.
Frequently Asked Questions
Why do I need a toilet flange extender after tiling, and how do I know if I need one?
Tiling often raises the floor level, causing the existing toilet flange to sit too low. This prevents the wax ring from creating a proper, watertight seal, leading to potential leaks. You know you need an extender if the top of your existing flange is below the new finished floor level.
Is installing a toilet flange extender a difficult DIY project for a beginner, and how long does it typically take?
This project is rated as 'beginner' difficulty because it primarily involves careful measurement, cleaning, and sealing, not complex plumbing pipework. Most DIYers can complete it in approximately 3 hours, assuming all necessary tools and materials are readily available.
What are the most crucial tools and materials I'll need to ensure a successful, leak-free installation?
Beyond basic tools like a tape measure and caulk gun, a quality toilet flange extender kit and a reliable silicone sealant are critical. Don't skip on robust #10 3” wood screws for securely fastening the extender to the subfloor, as any movement can compromise the seal. Thorough cleaning materials are also essential.
What are the common mistakes to avoid when installing a toilet flange extender to prevent future leaks?
The most common mistakes include not thoroughly cleaning the old flange, failing to apply sufficient silicone sealant for a waterproof bond, and not securing the extender firmly to the subfloor. Always dry-fit the extender to ensure the correct height (flush or slightly above the finished floor) before applying sealant.
Can I stack multiple flange extenders if my floor level is significantly higher than the existing flange?
While some flange extenders are designed to be stackable, it's generally best to use a single extender that matches your required height if possible to maximize stability. Stacking can increase the risk of instability and leaks, so if your flange is excessively low, consider a single deeper extender or consult a professional.
Do I need to turn off the main water supply to the house for this project, and what safety precautions should I take?
You only need to turn off the water supply to the specific toilet you're working on, not the entire house. After turning off the supply, flush the toilet to empty the tank and bowl. Wearing gloves is recommended when handling old wax or strong cleaners, and ensure good ventilation when using silicone sealant.


