

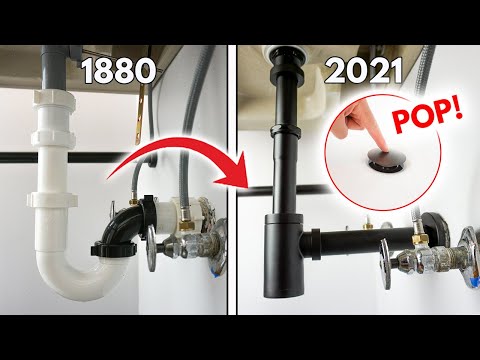
How to Install a Garbage Disposal for the First Time
About This Project
A comprehensive, step-by-step guide for a first-time installation of a garbage disposal. This process involves preparing the sink area, removing the existing sink drain, installing the new disposal mounting assembly, mounting the unit, and connecting all plumbing and electrical components.
Best for advanced DIYers and professionals with basic plumbing knowledge and familiarity with power tools. Requires Klein Tools Digital Dual Range Non Contact Voltage Tester, 12-1000V AC NCVT-2PR.
Tools & Materials

Unger 6 Gal. Heavy-Duty Plastic Bucket DB02

Towel
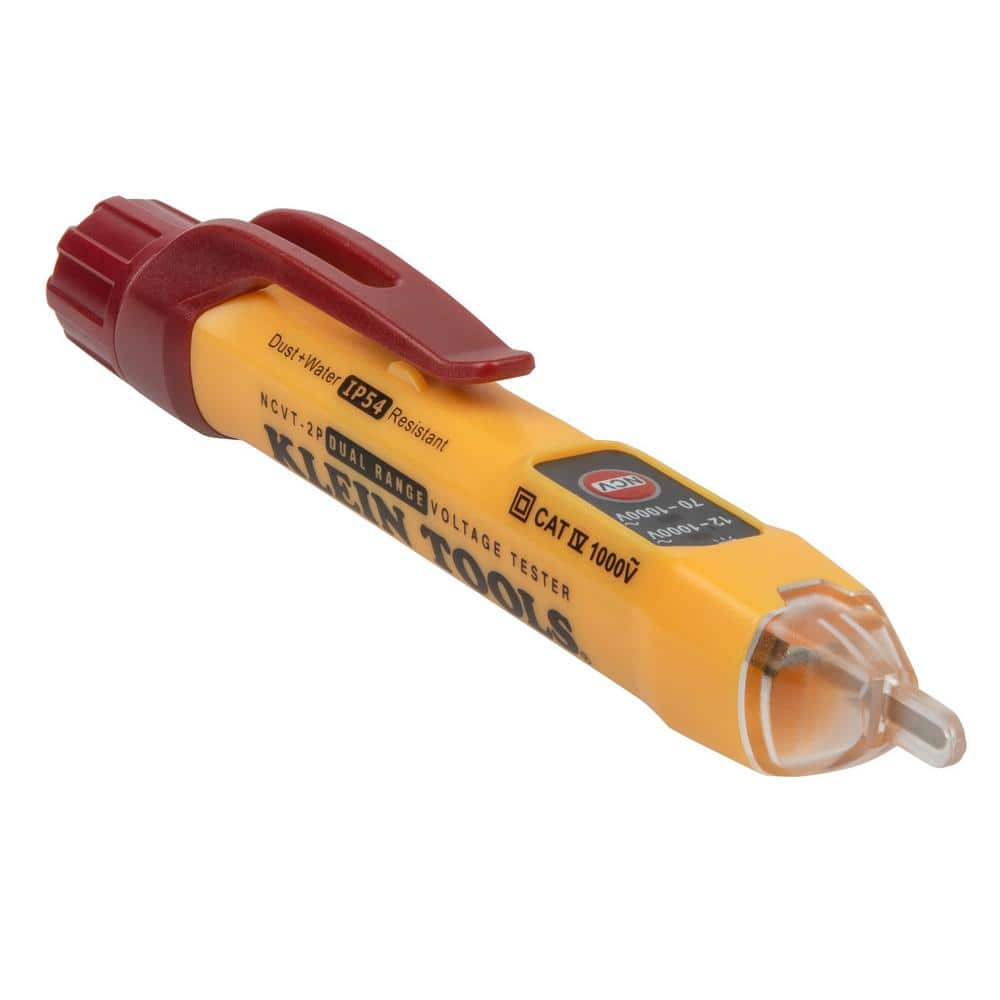
Klein Tools Digital Dual Range Non Contact Voltage Tester, 12-1000V AC NCVT-2PR

Channellock 12 in. V-Jaw Tongue and Groove Pliers 442
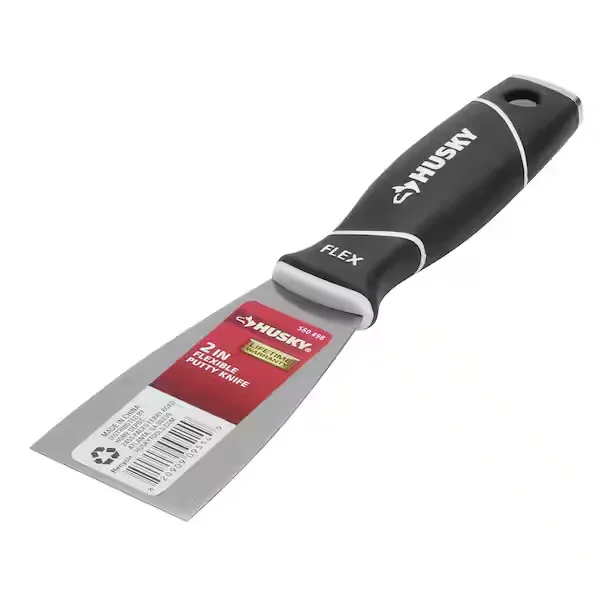
Putty knife

HDX 2 lbs. Microfiber Rags RHDMF2LB-RAGS
Unger 6 Gal. Heavy-Duty Plastic Bucket DB02
The Unger 6-Gallon Heavy-Duty Professional Cleaning Bucket holds more than 6 Gal. of liquid. The bucket can accommodate a scrubber up to 14 in. L. This bucket features measurement marks and 2-pour spouts
Towel
Absorbs moisture and dries surfaces.
Klein Tools Digital Dual Range Non Contact Voltage Tester, 12-1000V AC NCVT-2PR
The NCVT-2P is a non-contact voltage tester that detects 12 to 1000V AC and indicates the presence of voltage in cables, cords, circuit breakers, light fixtures, switches, outlets and wires as well as
Channellock 12 in. V-Jaw Tongue and Groove Pliers 442
CHANNELLOCK 442 12" Tongue & Groove Pliers feature a unique v-jaw design that creates more points of contact on round stock and tubing. These pliers are built to last with a PERMALOCK fastener to eliminate
Putty knife
Spreads putty with its flat blade.
HDX 2 lbs. Microfiber Rags RHDMF2LB-RAGS
HDX Microfiber Cloth is built to last. It's designed to handle the toughest of project with ease and is washable and reusable. Microfiber can hold more liquid than your average cotton towel and is also
Steps

Preparation and Safety Shutdown
15 minsBegin by ensuring the work area is safe. Go to your home's main electrical panel (breaker box) and shut off the circuit breaker that supplies power to the kitchen sink area. Place a non-contact voltage tester near the outlet to confirm the power is off. Clear everything out from the cabinet under the sink to give yourself ample room to work. Lay down old towels and place a bucket directly under the P-trap to catch water when you disconnect the drain.

Disconnect Existing Drain Plumbing
25 minsUsing channel-lock pliers, loosen the slip nuts on the P-trap that connect it to the sink's tailpiece and the drain arm extending from the wall. Once loose, you can usually finish unscrewing them by hand. Carefully lower the P-trap and empty any contained water into the bucket. Next, loosen the large nut holding the existing sink strainer assembly to the bottom of the sink. You may need another person to hold the strainer from above to keep it from spinning. Once the nut is removed, push the old strainer up and out of the sink drain opening. Scrape away any old plumber's putty from the sink opening.
Install the New Mounting Assembly
20 minsTake a small amount of plumber's putty and roll it into a snake-like rope about 1/2-inch thick. Press this rope firmly around the underside of the new sink flange (the metal drain piece). From the top of the sink, press the flange down into the drain opening so it is seated evenly. From underneath the sink, slide the fiber gasket, then the backup flange (a metal or plastic ring), and finally the mounting ring over the sink flange's neck. Secure these by threading on the snap ring; push it on until it pops into the groove on the flange. Tighten the three mounting screws on the mounting ring evenly with a screwdriver. This will squeeze the backup flange up, compressing the putty and creating a watertight seal. Scrape away any excess putty that squeezes out in the sink basin.

Prepare the Disposal Unit
10 minsBefore mounting the disposal, you must prepare it. If you are connecting a dishwasher, lay the disposal on its side and locate the dishwasher drain inlet. You will see a knockout plug inside the inlet. Insert the tip of a screwdriver into the inlet and tap it firmly with a hammer to knock the plastic plug out. Reach into the grinding chamber and retrieve the loose plastic plug. If your disposal did not come with a power cord pre-attached, you will need to install one now by following the manufacturer's specific wiring instructions.

Mount the Garbage Disposal
15 minsThis is often the most physically challenging step. Lift the garbage disposal up to the mounting ring. Align the three tabs on the top of the disposal with the ramped grooves on the lower mounting ring. Once aligned, turn the lower mounting ring clockwise until the disposal tabs lock securely into place. You will feel and hear it lock. Most disposals come with a small 'wrenchette' or you can use the end of a screwdriver in the lugs of the mounting ring to get the leverage needed for the final turn.

Connect the Discharge and Drain Pipes
30 minsFirst, attach the plastic discharge tube (usually an L-shaped pipe) to the side of the disposal using the supplied gasket and flange/screws. Hand-tighten the screws, then give them a final quarter-turn with a screwdriver. Next, connect the dishwasher drain hose to the dishwasher inlet you prepared earlier and secure it with a hose clamp. Finally, connect the disposal's discharge tube to the P-trap. You may need to cut a section of straight PVC pipe with a hacksaw to get the alignment right. Dry-fit all the P-trap pieces first, then secure all slip nuts. Hand-tighten them, then give a final quarter-turn with channel-lock pliers.

Connect Power and Test for Leaks
15 minsPlug the disposal's power cord firmly into the switched electrical outlet under the sink. Go back to the electrical panel and turn the circuit breaker back on. Place the sink stopper in the sink drain and fill the sink basin about halfway with cold water. Now, for the moment of truth: turn on the wall switch for the disposal, then pull the sink stopper out. Let the water and disposal run while you carefully inspect every connection point for leaks with a flashlight: the sink flange, the discharge tube connection to the disposal, all P-trap slip nuts, and the dishwasher hose connection. If you see any drips, turn everything off and tighten the leaking connection slightly.
Common Problems
As the narrator mentioned breaking his pipe, be gentle. Plastic fittings can crack if you apply too much force. Hand-tight plus a quarter turn with pliers is often enough for reassembly.
Solution: To avoid this issue: Be mindful of this warning and take appropriate precautions.
The P-trap is designed to hold water to block sewer gases, so it will be full. Ensure your bucket is in position before loosening the nuts.
Solution: To avoid this issue: Be mindful of this warning and take appropriate precautions.
Make sure the power is turned off first.
Solution: To avoid this issue: Be mindful of this warning and take appropriate precautions.
Dishwasher water backs up into the sink.
Solution: Ensure the drain hose has a high loop (higher than the connection point) to prevent water from the sink from flowing back into the dishwasher.
Thoroughly check for leaks after running the dishwasher for the first time. A small drip can cause significant water damage over time.
Solution: To avoid this issue: Be mindful of this warning and take appropriate precautions.
Only knock out the dishwasher plug if you are connecting a dishwasher. If you knock it out by mistake, the disposal will leak when you run the dishwasher.
Solution: To avoid this issue: Be mindful of this warning and take appropriate precautions.
Always double-check all connections before restoring power and water.
Solution: To avoid this issue: Be mindful of this warning and take appropriate precautions.
Frequently Asked Questions
What are the essential safety steps to take before and during a first-time garbage disposal installation?
Always turn off the power to the sink area at the circuit breaker first to prevent electrical shock. Wear safety glasses to protect your eyes from debris, and use a bucket and rags to manage water spills. Ensure all electrical connections are secure and properly grounded before restoring power.
Beyond the disposal unit itself, what critical tools and materials are often overlooked but necessary for a smooth installation?
Don't forget plumber's putty for sealing the sink flange, a large bucket and plenty of rags (like HDX Microfiber Rags or WYPALL Towels) for catching residual water, and a good flashlight (like the Panther Vision FLATEYE) to illuminate the workspace. While not always included, you may need a specific InSinkErator 3 ft. Power Cord Installation Kit if your unit isn't pre-wired.
How much time should a beginner set aside for this project, and which part is typically the most challenging?
A first-time garbage disposal installation typically takes 2-4 hours, assuming no major plumbing issues. The most challenging parts are often securing the mounting assembly tightly to the sink to prevent leaks, and making proper, safe electrical connections if you're wiring it yourself rather than just plugging it in.
What are the most common mistakes first-time installers make, and how can I avoid them, especially regarding leaks?
Common mistakes include not applying enough plumber's putty around the sink flange, forgetting to remove the dishwasher knockout plug (if connecting a dishwasher), or not tightening the mounting bolts evenly. To avoid leaks, ensure all connections are hand-tightened and then carefully finished with pliers, and always double-check by running water through the sink for several minutes before buttoning everything up.
What electrical considerations do I need to address before installing my new garbage disposal?
You will need a dedicated 120-volt, grounded electrical outlet under the sink, preferably controlled by a wall switch. If your disposal doesn't come with a pre-installed power cord, you'll need to purchase and correctly wire a power cord kit, such as the InSinkErator 3 ft. Power Cord Installation Kit, ensuring proper grounding.
After installation, what's the best way to test the garbage disposal to ensure it's working correctly and not leaking?
After all connections are made, run water into the sink for several minutes while meticulously checking all plumbing joints and the mounting assembly for any drips or leaks. Then, turn on the disposal briefly to ensure it operates smoothly and quietly, and re-check for leaks immediately after it runs.


