Toilet Leak Repair: Troubleshooting Guide
About This Project
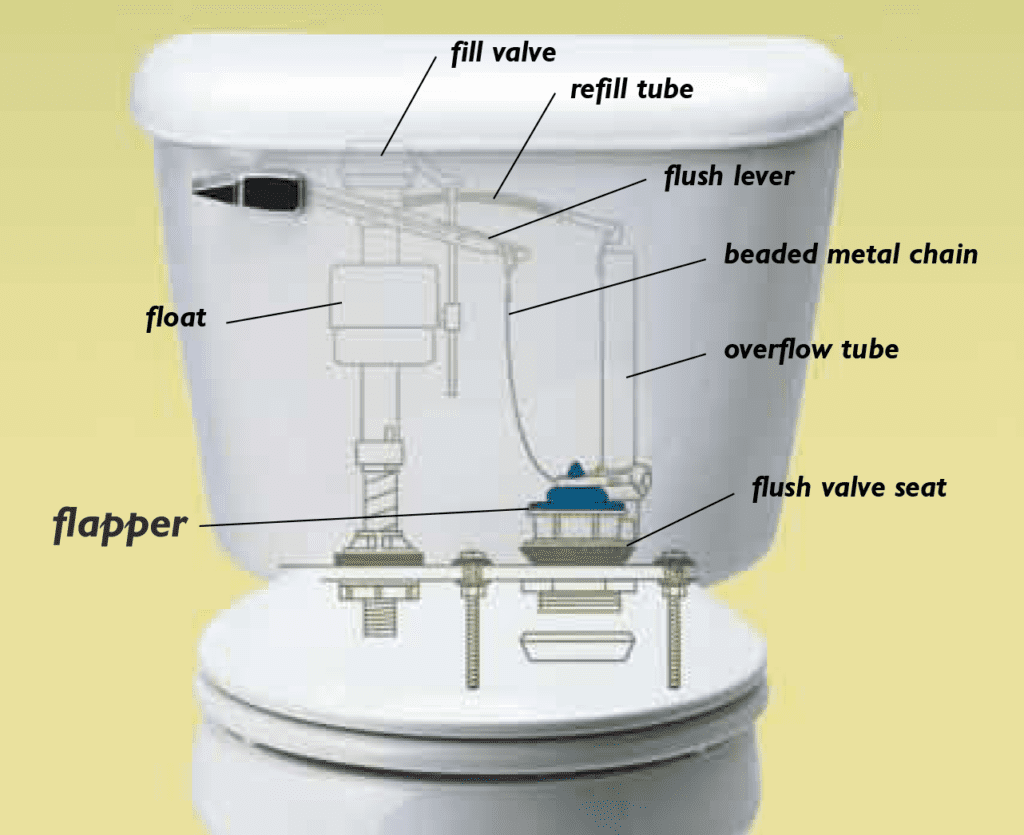
This project provides a troubleshooting guide for repairing toilet leaks. It involves three main steps: 1. **Visual Inspection for Toilet Leaks:** Examine the entire toilet, including the base, tank, bowl, supply line, and shut-off valve for any visible signs of leaks, drips, or corrosion. 2. **Conducting a Toilet Tank Leak Test:** Add food coloring to the tank and wait to see if colored water appears in the bowl, indicating a flapper leak. 3. **Inspecting the Toilet Water Supply Line:** Check the supply line and shut-off valve for drips, corrosion, or damage, paying attention to all connection points.
Best for homeowners and DIY enthusiasts.
Tools & Materials

LaHabra Allegro II 4 oz. Liquid Color #AL50 Crystal White 746699
LaHabra Allegro II 4 oz. Liquid Color #AL50 Crystal White 746699
LaHabra offers Allegro II in a base or liquid color system. The LaHabra Allegro II Liquid color is a prepackaged bottle of liquid color composed of pigments and dispersing agents to be mixed into a bag
Steps

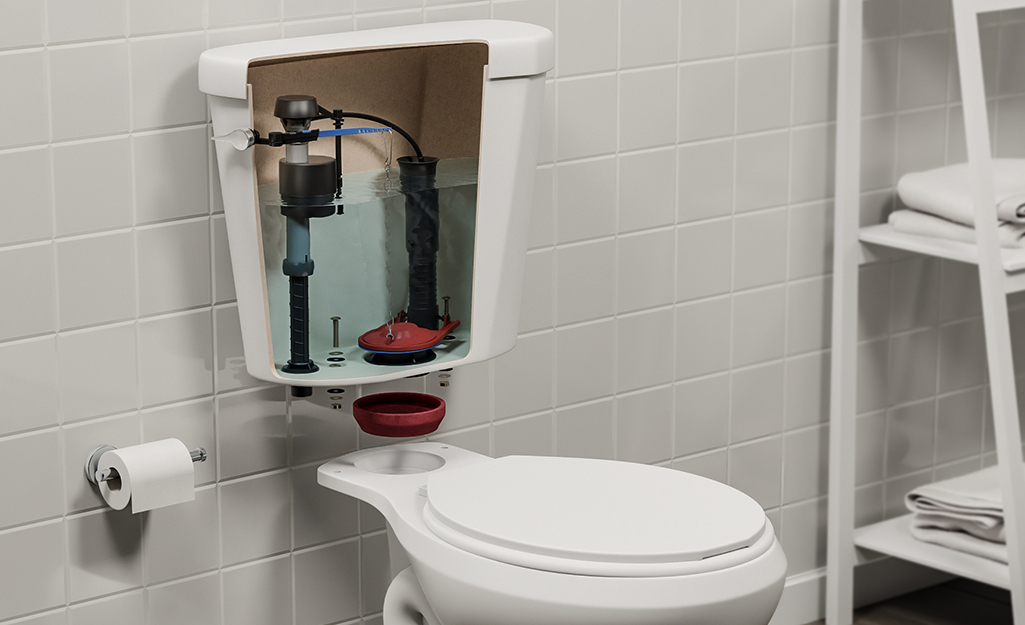
Visual Inspection for Toilet Leaks
5 minsBegin by carefully inspecting the entire toilet for any signs of leaks. Check the base for water pooling or dampness. Look closely for drips or streams of water from the tank or bowl. Don't forget to examine the water supply line and shut-off valve for any leaks or corrosion.

Common Problems
Safety concern: Turn off the water supply to the toilet before attempting any repairs.
Solution: Take proper safety precautions. Turn off the water supply to the toilet before attempting any repairs.
Prevention: Always follow safety guidelines before starting the project.
A crack in a toilet tank can lead to significant water damage if not addressed promptly. The user experienced water leaking through the floor into the basement.
Solution: To avoid this issue: Be mindful of this warning and take appropriate precautions.
Incorrectly identifying the leak's origin leads to wasted time and ineffective repairs.
Solution: Checking for prior leaks helps confirm the source of the problem before starting the repair.
Difficulty pinpointing toilet leaks due to water traveling to the lowest point.
Solution: The location where water drips is not always the source of the leak; water can travel along surfaces to the lowest point.
Toilet constantly runs or has bowl ripples indicating a leak.
Solution: Listening for a constant running sound or seeing ripples on the water surface in the bowl are initial indicators of a leak.
In-tank cleaning tablets, especially those with bleach, can cause plastic and rubber parts in the tank to deteriorate faster.
Solution: To avoid this issue: Be mindful of this warning and take appropriate precautions.
Toilet continues to run after flush due to undetected internal leaks.
Solution: Listen for the initial rush of water. If the sound stops, it indicates there are no major leaks in the system.
Frequently Asked Questions
What basic tools will I need to perform these toilet leak troubleshooting steps?
For these basic troubleshooting steps, you'll primarily need a good flashlight to thoroughly inspect all areas. You should also have some paper towels or dry rags to confirm any suspected moisture. An adjustable wrench might be helpful for gently checking supply line connections, but the focus is on inspection.
What's the most important safety step to take before I start troubleshooting a toilet leak?
The most crucial safety step is to locate and turn off the water supply to the toilet using the shut-off valve, usually found behind or below the toilet. This prevents potential water damage if a leak worsens or if you accidentally loosen a connection during your inspection.
How long should I wait after adding food coloring to the tank before checking the bowl for a leak?
For an accurate tank leak test, you should wait at least 15-30 minutes, or even up to an hour, after adding food coloring to the tank. This gives enough time for the colored water to slowly seep past a faulty flapper or seal and become visible in the toilet bowl.
What are some less obvious spots I should check during the visual inspection for leaks?
Beyond the obvious, carefully check around the toilet's base where it meets the floor, especially near the bolts. Also, inspect the small rubber grommets where the tank bolts connect to the bowl, and the underside of the tank for any hidden condensation or drips that might indicate a slow leak.
What if I can't find any visible leaks after completing all the troubleshooting steps?
If you've diligently performed all steps and found no obvious leak, consider if the leak might be intermittent or very slow. Try placing dry paper towels around the base and supply line connections overnight to catch any subtle moisture. If the problem persists, it might indicate a more complex issue requiring professional attention.
If I identify a leak using this guide, is the actual repair usually expensive or difficult for a beginner?
Many common toilet leaks, such as a faulty flapper or a loose supply line connection, are relatively inexpensive to fix and often manageable for a beginner DIYer. Replacement parts are typically affordable, and the repairs usually require only basic tools. More extensive issues like a cracked bowl or a bad wax ring can be more involved.