
How to Use a Main Line Cleanout to Clear a Major Sewer Clog
About This Project
A step-by-step guide for using a motorized drain auger (snake) through a main line cleanout to clear a significant sewer blockage causing backups in the home's plumbing system.
Best for advanced DIYers and professionals with basic plumbing knowledge and familiarity with power tools. Requires Tracker Safe 5-1/2 in. x 9-3/4 in. Elastic 3-Magazine Holder for Gun Safe PE3.
Tools & Materials

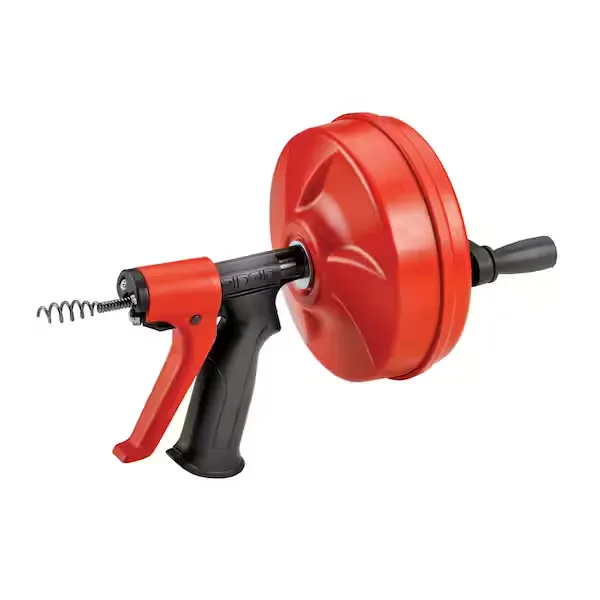
VEVOR 75 ft. x 1/2 in. Drain Cleaning Machine 370-Watt Electric Drain Auger, Portable Sewer Snake Auger Cleaner with Cutters GDSTJ75FTX1-2YC01V1-0612

Unger 6 Gal. Heavy-Duty Plastic Bucket DB02

YOFE Black Storage Cabinet Long Gun Safe Large Rifle Safe Quick Access Biometric Fingerprint 5 Gun Cabinet with Silent Mode CamyBK-GI42555W1000-GCabinet01

Husky Large Water Resistant Leather Work Glove HK86006-L
Carolina Cottage Colton Warm Chestnut End Table CF2300MTRT-IND
Auger
VEVOR 75 ft. x 1/2 in. Drain Cleaning Machine 370-Watt Electric Drain Auger, Portable Sewer Snake Auger Cleaner with Cutters GDSTJ75FTX1-2YC01V1-0612
VEVOR Commercial Drain Cleaner Machine has a solid core cable and foot control and replaceable cutters. This sewer snake machine provides a more powerful choice for homeowners to clear clogged objects
Unger 6 Gal. Heavy-Duty Plastic Bucket DB02
The Unger 6-Gallon Heavy-Duty Professional Cleaning Bucket holds more than 6 Gal. of liquid. The bucket can accommodate a scrubber up to 14 in. L. This bucket features measurement marks and 2-pour spouts
YOFE Black Storage Cabinet Long Gun Safe Large Rifle Safe Quick Access Biometric Fingerprint 5 Gun Cabinet with Silent Mode CamyBK-GI42555W1000-GCabinet01
Our quick-access storage cabinet focus on protecting your valuables from theft so you can rest easy. It will be the ideal solution for the safe storage of your large rifles, shotguns, money, and so on.
Husky Large Water Resistant Leather Work Glove HK86006-L
This premium grain cowhide Leather Driver Glove from Husky is great for heavy-duty work. Its water-resistant properties enable you to work in wet and damp conditions, allowing your hands to stay dry and
Carolina Cottage Colton Warm Chestnut End Table CF2300MTRT-IND
Our Adjustable Colton Vintage Table has a modern, stylish look that can suit any room. With its industrial design, it is an aesthetically appealing, strong addition to any home. The adjustable table height
Auger
Clears smaller drain lines effortlessly.
Steps

Preparation and Safety
20 minsBefore starting any work, prioritize safety. Put on your full Personal Protective Equipment (PPE), including safety goggles to protect your eyes from splashes, heavy-duty waterproof gloves to protect your hands from sewage, and either old clothes or a pair of coveralls. Ensure you have read the operating manual for the motorized drain auger you have rented. Position the auger on stable, level ground near the cleanout. Lay down a large plastic tarp around the cleanout area to catch any spills and make cleanup easier. Have several large buckets ready to manage any wastewater that may flow out when the plug is removed.

Locate and Prepare the Cleanout
15 minsLocate the main sewer line cleanout. This is typically a 3- to 4-inch diameter pipe with a screw-on cap or plug. In this case, we are assuming it is located outside the house, close to the foundation. It may be at ground level or sticking up a few inches. Clear any dirt, grass, overgrown plants, or other debris from around the cleanout cap so you have a clean, safe working area and can get an unobstructed grip on the plug with your pipe wrench.

Open the Cleanout Plug
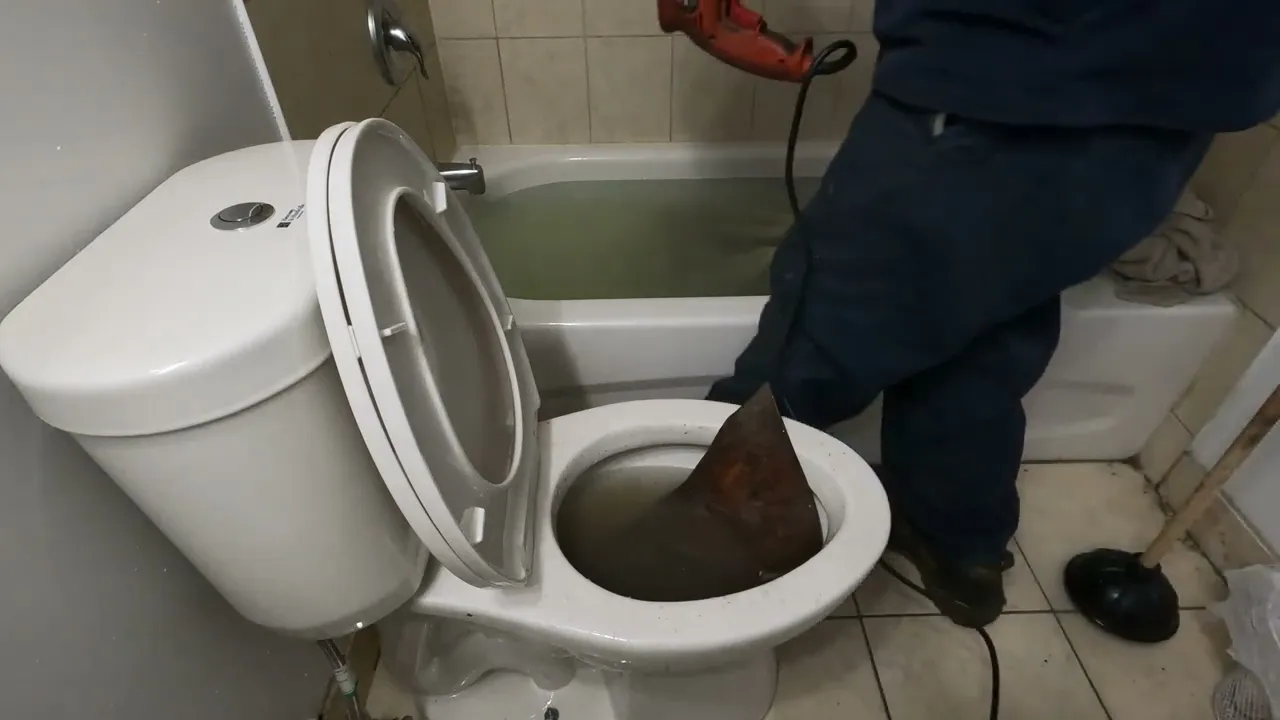
15 minsPosition yourself uphill or to the side of the cleanout opening, never directly in front of or below it. Place a large bucket directly under the cleanout opening to catch initial backflow. Using a large pipe wrench, fit it securely onto the square nut on the cleanout plug. Apply steady pressure to turn the plug counter-clockwise. It may be very tight. Once the plug begins to loosen, unscrew it the rest of the way slowly by hand. Be prepared for wastewater to gush out. If it does, pause and let the pressure release and the backup drain into your bucket(s) before fully removing the plug. This step is critical and can be very messy.

Insert the Auger Cable
10 minsWith the cleanout now open, select an appropriate cutter head for the auger's cable. A spiral or 'retrieving' head is a good general-purpose choice for starting. Attach it securely to the end of the cable according to the machine's instructions, often using a small pin or screw. Carefully begin to feed the cable by hand into the cleanout pipe. Keep pushing it in until you feel resistance. This resistance is likely the clog. Once you've located it, pull the cable back about one foot to give the cutter head space to work effectively.

Operate the Motorized Auger
30 minsPosition the motorized drain auger so the cable can feed as straight as possible into the pipe to prevent it from kinking or binding. Ensure your safety goggles and gloves are securely on. Set the machine's directional control switch to 'Forward'. Place your foot over the pneumatic foot pedal but do not press it yet. Firmly grip the cable with your gloved hands a safe distance from the pipe opening. Press the foot pedal to engage the motor and begin rotating the cable. Slowly and deliberately advance the cable forward into the pipe. Do not force it; let the machine's rotation and the cutter head do the work.

Work Through the Clog
30 minsAs the auger cutter head encounters the clog, you will feel the cable tense up and the motor may strain. This is normal. To effectively clear the blockage, use a back-and-forth motion. Advance the cable a few inches into the clog, then retract it slightly, allowing the cutter to break up the material. Repeat this process. Listen for changes in the motor's sound and feel for a reduction in resistance, which indicates you are breaking through. Once you feel the cutter pass through the main obstruction, continue to feed the cable another 10-15 feet down the line to ensure the pipe is fully cleared of any residual debris. If you pull the head back and it is covered in tree roots, you've found the common culprit.

Retrieve Cable and Test Drain
20 minsOnce you are confident the line is clear, it's time to retrieve the cable. Switch the auger's directional control to 'Reverse'. Activate the motor with the foot pedal and carefully guide the cable back out of the drain and into the machine's drum. It's highly recommended to have a garden hose with a spray nozzle ready. As the cable retracts, spray it down to clean off the sewage and debris, which makes cleanup much easier. After the entire cable is back in the drum, test your work. Run the garden hose at full blast down the open cleanout pipe for 5-10 minutes. Then, ask your helper to go inside and flush a toilet and run a sink simultaneously to confirm that the drains are flowing freely and not backing up.

Close Cleanout and Clean Up
20 minsWith the line confirmed clear, the final step is to seal the cleanout and clean your work area. For a better seal and to make future removal easier, wrap the threads of the cleanout plug with three to four layers of Teflon tape in a clockwise direction. Screw the cleanout plug back into the pipe, starting it by hand to avoid cross-threading. Finish tightening it with the pipe wrench until it is snug. Be careful not to overtighten, as this can crack the plastic fitting or pipe. Roll up the plastic tarp, ensuring any mess is contained within it for easy disposal. Dispose of soiled rags and gloves. Thoroughly clean any rented equipment according to the rental company's instructions before returning it.
Common Problems
Do not tighten the cap excessively. It needs to be loose enough for water pressure to pop it open during a backup.
Solution: To avoid this issue: Be mindful of this warning and take appropriate precautions.
Difficulty seating the cleanout fitting leads to leaks and an incomplete seal.
Solution: Removing the cap first makes it easier to manipulate the fitting and apply pressure evenly when seating it in the pipe.
Before this step, make sure the Allen set screw securing the adapter to the turning shaft is tight. This prevents the cleanout cap from falling off after removal.
Solution: To avoid this issue: Be mindful of this warning and take appropriate precautions.
Do not overtighten the plastic slip nuts, as this can crack them. Hand-tight plus a quarter turn with pliers is usually sufficient.
Solution: To avoid this issue: Be mindful of this warning and take appropriate precautions.
Excess pipe dope creates messy joints and potential blockages.
Solution: Applying a thin, even coat of pipe dope is sufficient. Excess sealant can be squeezed out and look messy.
Overtightening the plastic plug can crack it or make it impossible to remove.
Solution: Don't overtighten the plastic plug when reinstalling, as it can crack or become difficult to remove later.
Clear out clogs promptly to prevent nasty sewer gas smells or odors from decaying matter from entering your home.
Solution: To avoid this issue: Be mindful of this warning and take appropriate precautions.
Frequently Asked Questions
How do I know for sure if I have a main line sewer clog, as opposed to a blockage in a single drain?
A main line clog typically presents as multiple drains backing up simultaneously, often in the lowest parts of your home (e.g., toilet flushing causes water to rise in a shower). If only one sink or toilet is affected, it's likely a localized clog. This project is specifically for widespread backups indicating a main line issue.
What are the most crucial safety precautions I need to take when working with raw sewage and a motorized drain auger?
Always wear robust waterproof gloves (like G & F Products 1628 L) and safety glasses to protect against sewage, debris, and auger cable whipping. Ensure the work area is well-ventilated, lay down a heavy-duty tarp (e.g., TARPCO SAFETY 24 ft. x 36 ft.) to contain spills, and never operate the auger without understanding its controls. Keep hands clear of the spinning cable at all times.
Can I use a chemical drain cleaner or a hand-crank auger for a major main line clog instead of a motorized one?
For a major main line clog, chemical drain cleaners are typically ineffective and can be dangerous, potentially damaging pipes or the auger cable. A hand-crank auger usually lacks the power and reach needed for a severe main line blockage. A powerful motorized auger, such as the VEVOR 250-Watt model, is essential for clearing these significant clogs effectively.
What should I do if the motorized auger cable gets stuck in the pipe?
If the auger cable gets stuck, immediately reverse the motor's direction to try and free it. If that doesn't work, try gently pulling back on the cable while it's rotating slowly, or alternate between forward and reverse. Do not force the cable, as this can cause it to kink, break, or damage your plumbing system.
What's a common mistake beginners make when using a motorized drain auger, and how can I avoid it?
A frequent mistake is feeding the cable too quickly or attempting to force it through tough resistance, which can lead to kinking the cable or damaging the auger head. Feed the cable slowly and allow the auger's motor and cutting head to do the work. If you encounter strong resistance, retract slightly, then try again gently.
Besides the tools listed, what other hidden costs or considerations should I factor into this 6-hour project?
While the project is estimated at 6 hours, it could take longer, so budget a full day. Beyond potentially purchasing or renting a motorized auger (which can be a significant cost), you might need a new cleanout plug if yours is old or damaged. Also, account for the cost of disposable trash cans, additional cleanup supplies, and potentially having to call a professional if you can't clear the clog yourself.
After successfully clearing the main line clog, what steps should I take to prevent it from reoccurring quickly?
Once the clog is cleared, run hot water from multiple fixtures for several minutes to flush out any remaining debris. Implement good habits like avoiding flushing 'flushable' wipes, pouring grease down drains, or disposing of large amounts of food waste. Consider a regular maintenance routine, such as periodically flushing drains with hot water and baking soda or vinegar.


