
How to Replace a Leaky Angle Stop (Shutoff Valve) Under Your Sink
About This Project
This guide provides comprehensive, step-by-step instructions for replacing a leaky angle stop (the small shutoff valve under a sink). The process involves shutting off the main water supply to the house, draining the remaining water from the lines, removing the old compression-style valve, cleaning the pipe, installing a new quarter-turn ball valve, and thoroughly testing for leaks.
Best for advanced DIYers and professionals with basic plumbing knowledge.
Tools & Materials

MOEN Flo 1 in. Smart Water Monitor and Automatic Water Shut Off Valve 900-006
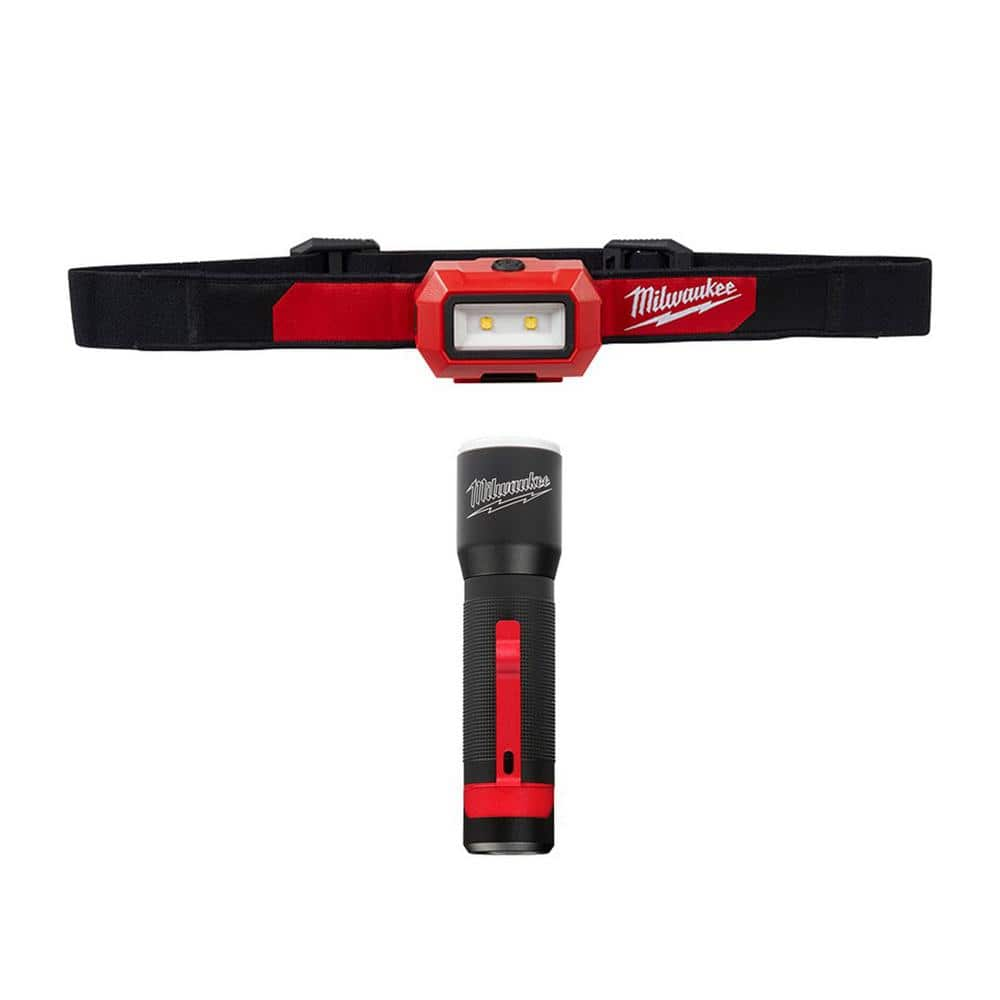
Milwaukee 350 Lumens LED Headlamp With 325 Lumens LED Aluminum Flashlight 2103-2107

Unger 6 Gal. Heavy-Duty Plastic Bucket DB02

Towel
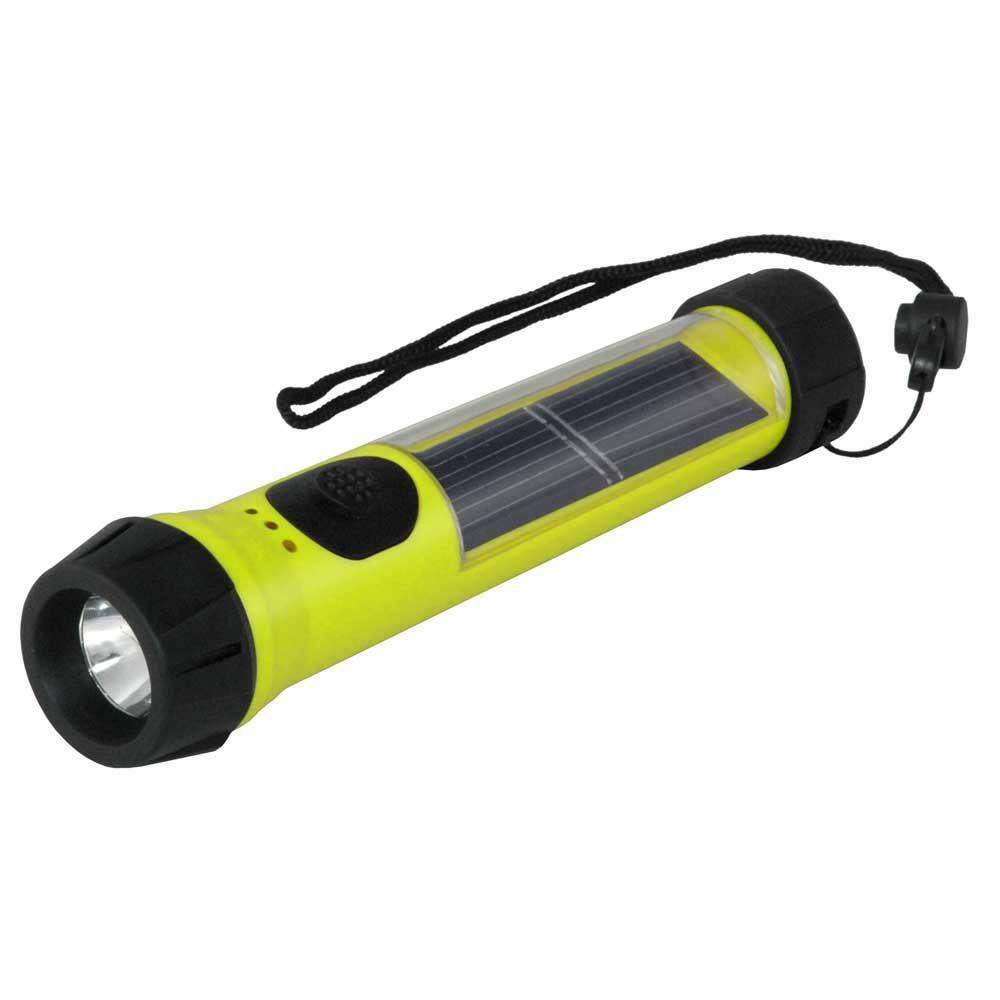
Hybrid Light Solar Flashlight - Hi-Vis Yellow 001397

Adjustable Wrench
MOEN Flo 1 in. Smart Water Monitor and Automatic Water Shut Off Valve 900-006
Bring smart plumbing to your home with the Flo Smart Water Monitor and Shutoff. The Smart Water Monitor and Shutoff is a smart home water security system that provides 24/7 protection by monitoring for
Milwaukee 350 Lumens LED Headlamp With 325 Lumens LED Aluminum Flashlight 2103-2107
The Milwaukee Headlamp is more compact for all day comfort and delivers 350 Lumens of TRUEVIEW High Definition output in a wide flood beam. The LED headlamp is optimized to be lightweight and compact with a strap made from a washable, sweat absorbing microfiber, providing all-day comfort when worn on the forehead. The headlamp light's impact-resistant housing is built to withstand the toughest conditions. It survives drops and is IP54 rated for water and dust resistance. With 7 different tilt positions, users can direct the light by pivoting the light head. The Milwaukee headlamp has 3 light output modes to manage brightness and runtime, giving users up to 28 hours of runtime. The headlamp includes four clips for secure attachment to hard hats while users are on the jobsite. This headlamp is covered by a limited lifetime warranty. The Milwaukee 325L Focusing Flashlight delivers 325 Lumens of TRUEVIEW High Definition Output and is a Brighter, More Durable Everyday Flashlight.
Unger 6 Gal. Heavy-Duty Plastic Bucket DB02
The Unger 6-Gallon Heavy-Duty Professional Cleaning Bucket holds more than 6 Gal. of liquid. The bucket can accommodate a scrubber up to 14 in. L. This bucket features measurement marks and 2-pour spouts
Towel
Absorbs moisture and dries surfaces.
Hybrid Light Solar Flashlight - Hi-Vis Yellow 001397
The Hybrid Solar Light uses revolutionary technology that generates power from any light source, indoor lighting or sun light and stores it for later use. The Hybrid Solar Light is always collecting power
Adjustable Wrench
Fits various nut and bolt sizes with its adjustable jaw.
Steps

Shut Off Main Water Supply
10 minsBefore any plumbing work can begin, you must shut off the water to the entire house. Locate your main water shutoff valve, which is typically found in a basement, garage, or utility closet near where the water service line enters the house. Turn the valve handle clockwise until it is fully closed. To confirm the water is off and to relieve pressure in the pipes, go to the lowest faucet in the house (like a basement sink or outdoor spigot) and open it. Let the water run until it slows to a trickle.

Prepare the Work Area
5 minsClear out all items from under the sink to give yourself ample room to work. Place a small bucket or bowl directly underneath the angle stop you will be replacing. This will catch any water that remains in the supply line. Lay down several old towels around the bucket to protect the cabinet floor from any spills or drips.

Disconnect Faucet Supply Line
5 minsUsing an adjustable wrench or channel-lock pliers, grip the compression nut that connects the flexible faucet supply line to the outlet of the angle stop. Turn the nut counter-clockwise to loosen it. A small amount of water will drain out into the bucket. Once loose, you should be able to unscrew it the rest of the way by hand. Gently move the supply line out of the way.

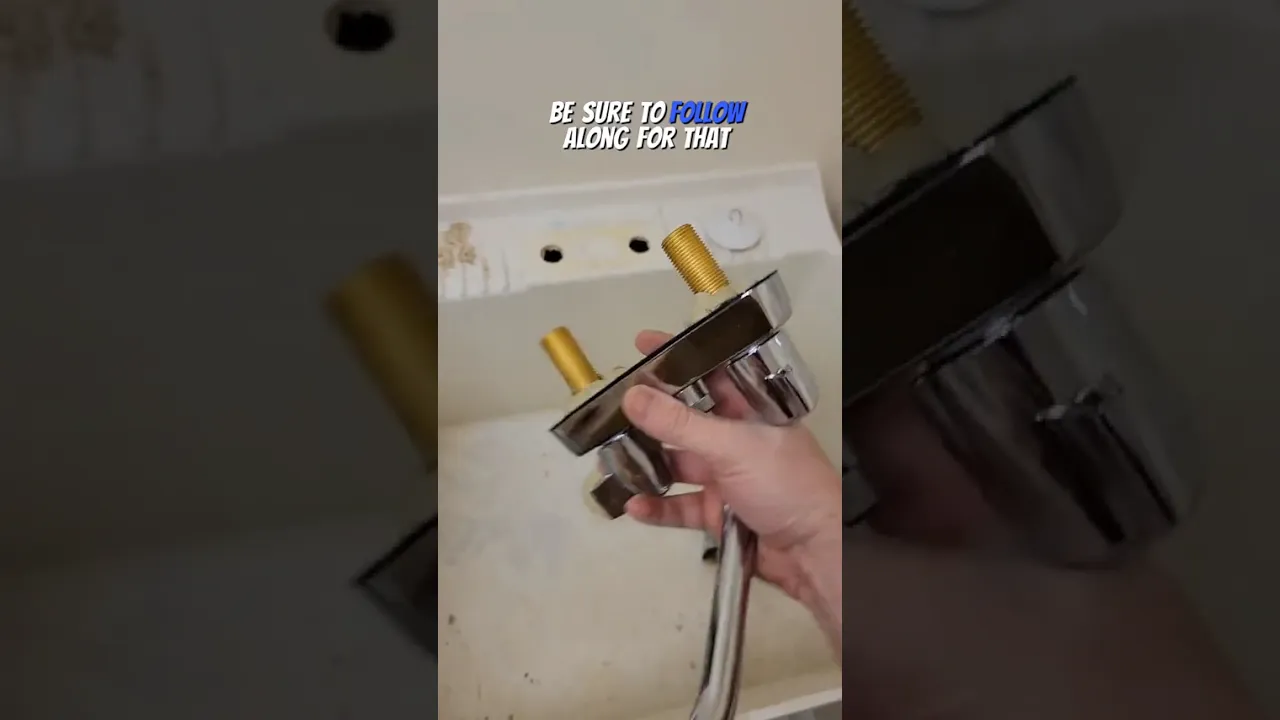
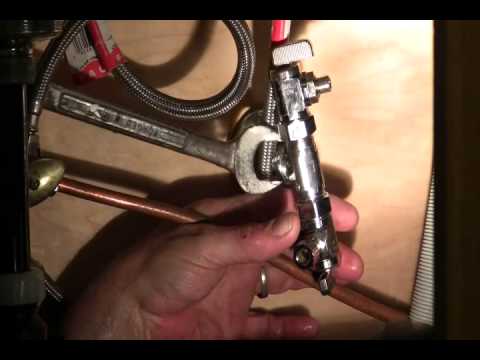
Remove the Old Angle Stop
20 minsThis step requires two wrenches to prevent damage. Place one wrench (or channel-lock pliers) on the body of the angle stop to hold it stationary. Place your second adjustable wrench on the large compression nut that connects the valve to the copper pipe coming out of the wall. Turn this nut counter-clockwise to loosen it. This may require significant force if it's old. Once loose, unscrew it by hand and slide the entire old valve off the pipe. Next, you must remove the old compression nut and the brass compression ring (ferrule). The ferrule can be stubborn. You can try to gently pry it off with a flathead screwdriver, but be careful not to scratch the pipe. A dedicated ferrule puller tool makes this much easier and safer.

Clean and Prepare the Pipe
5 minsAfter removing the old components, inspect the end of the copper pipe (the stub-out). Using a piece of emery cloth or fine-grit sandpaper, thoroughly clean the last inch of the pipe. Sand it until it's bright and shiny, removing any old pipe dope, mineral deposits, or minor scratches. A clean, smooth surface is essential for the new compression fitting to create a watertight seal. Once cleaned, wipe the pipe with a dry rag to remove any dust or debris.
Install the New Angle Stop
15 minsTake your new quarter-turn angle stop and disassemble it. Slide the new compression nut onto the copper pipe first, ensuring the threads face outwards (towards you). Next, slide the new brass ferrule onto the pipe, with its tapered end facing the end of the pipe. Push the body of the new valve onto the pipe until it rests snugly against the ferrule. Slide the compression nut up to the valve body and hand-tighten it. Now, use your two wrenches again: one to hold the valve body still, and the other to tighten the compression nut. Tighten the nut one-half to three-quarters of a turn past hand-tight. Do not over-tighten.

Reconnect the Faucet Supply Line
5 minsAlign the flexible faucet supply line with the outlet on the new angle stop. Screw the supply line's compression nut onto the valve's threaded outlet. Hand-tighten the nut until it is snug. Then, using an adjustable wrench, give it a final quarter-turn to half-turn to create a seal. The rubber cone washer inside the supply line nut does most of the sealing, so it does not require excessive force.

Turn On Water and Test for Leaks
10 minsWith the new angle stop in the 'off' position, return to the main water shutoff valve. Turn it on slowly and fully (counter-clockwise). Listen for the sound of pipes filling. Go back to the sink and use a flashlight and a dry paper towel to inspect the new valve. Check for any moisture around the main compression nut at the wall. If it's dry, slowly turn the handle of the new angle stop to the fully 'on' position (parallel to the outlet). Now check for leaks around the valve stem and where the faucet supply line connects. If all connections are dry, turn on the faucet and let it run for a minute. Perform one final check for any drips. Clean up your tools and towels.
Common Problems
You can't replace the angle stop without shutting off the water.
Solution: If you cannot find local shut-off valves under the sink, you will need to shut off the main water supply to the house.
Failure to shut off the water supply before starting will result in significant water damage.
Solution: To avoid this issue: Be mindful of this warning and take appropriate precautions.
Failing to shut off the water will result in uncontrolled water flow when you disassemble the faucet.
Solution: To avoid this issue: Be mindful of this warning and take appropriate precautions.
Always ensure the water is completely off before disassembling the faucet to avoid water damage.
Solution: To avoid this issue: Be mindful of this warning and take appropriate precautions.
Turn the water on slowly to avoid a sudden pressure surge that could stress the new connections.
Solution: To avoid this issue: Be mindful of this warning and take appropriate precautions.
Turn the water back on slowly. A sudden burst of pressure could cause a loose connection to fail.
Solution: To avoid this issue: Be mindful of this warning and take appropriate precautions.
Do not crimp or bend the copper tubing at a sharp angle, as this can restrict water flow or cause a weak point.
Solution: To avoid this issue: Be mindful of this warning and take appropriate precautions.
Frequently Asked Questions
How difficult is it to replace an angle stop, and how long does it typically take for a beginner?
This project is rated as 'beginner' difficulty, making it accessible for most DIYers. While shutting off water and working in tight spaces requires attention, the steps are straightforward. Expect to spend around 3 hours, which includes time for preparation, troubleshooting, and thorough leak testing.
What are the most important safety precautions I need to take before starting this plumbing repair?
The most critical step is to shut off the main water supply to your house to prevent potential flooding. Always have a bucket and plenty of absorbent towels like WYPALL L40 or ITOPFOX paper towels readily available for draining residual water and catching any spills. Good lighting, such as the Panther Vision FLATEYE flashlight, is also essential for working under the sink.
Do I really need specialized plumbing tools for this project, or can I get by with basic household tools?
While some tools listed are general, an adjustable wrench and quality tongue-and-groove pliers (like Channellock 430) are essential for securely tightening and loosening plumbing connections. These specialized tools provide the necessary grip and leverage to prevent stripping fasteners or damaging pipes, which household tools might struggle with.
What's the most common reason for a new angle stop to leak after installation, and how can I prevent it?
The most common reason for a leak is improper tightening of the compression nut or an uneven/burred pipe end. Ensure the copper pipe is clean and smooth, free of any imperfections, before sliding on the new compression components. Tighten the compression nut firmly with an adjustable wrench, but avoid overtightening, as this can damage the ferrule; a slight weep often just needs another quarter turn.
Why should I replace an old compression-style angle stop with a new quarter-turn ball valve like the Plumbshop PLB111X P?
Quarter-turn ball valves are a significant upgrade because they offer instant, positive shut-off with a simple 90-degree turn, making them much less prone to leaks or seizing compared to older multi-turn compression valves. They provide greater reliability and ease of use for future maintenance or emergencies, making the investment worthwhile.
What should I do if the old angle stop is seized onto the pipe and won't budge?
If the old valve is extremely stubborn, you can try applying a penetrating oil (like WD-40) to the connection and letting it soak for 15-20 minutes. Then, use your adjustable wrench with steady, firm pressure while counter-holding the pipe if possible. As a last resort, if there's sufficient pipe length, you might consider carefully cutting the pipe just behind the old valve with a mini pipe cutter.
How important is it to clean and prepare the pipe before installing the new valve, and what should I use?
Cleaning and preparing the pipe is crucial for a leak-free seal. Any burrs, corrosion, or debris on the copper pipe can prevent the new compression fitting from sealing properly. Use a fine-grit sandpaper or emery cloth to thoroughly clean the pipe end until it's smooth and shiny, ensuring the compression ring has a perfect surface to grip.