
How to Install a New Dishwasher
About This Project
This guide provides verbose, step-by-step instructions for the plumbing aspects of removing an old dishwasher and installing a new one. It covers disconnecting and connecting the hot water supply line, the drain hose, and ensuring all connections are watertight before final testing.
Best for experienced DIYers and homeowners with some experience with basic plumbing knowledge and familiarity with power tools. Requires Voltage / Circuit Tester.
Tools & Materials

Towel
Voltage / Circuit Tester

Unger 6 Gal. Heavy-Duty Plastic Bucket DB02
Klein Tools 3/16 in. Slotted Screw-Holding Flat Head Screwdriver with 3 in. Round Shank K23

Adjustable Wrench
WYPALL L40 Towels, Dry Up Towels, 19-1/2 in. x 42 in., White, 200 Towels/Roll KCC05860
Towel
Absorbs moisture and dries surfaces.
Voltage / Circuit Tester
Detects electrical voltage presence.
Unger 6 Gal. Heavy-Duty Plastic Bucket DB02
The Unger 6-Gallon Heavy-Duty Professional Cleaning Bucket holds more than 6 Gal. of liquid. The bucket can accommodate a scrubber up to 14 in. L. This bucket features measurement marks and 2-pour spouts
Klein Tools 3/16 in. Slotted Screw-Holding Flat Head Screwdriver with 3 in. Round Shank K23
Getting that screw to stay put while you get it in place is much easier with Klein's Slotted Screw-Holding screwdriver. Positive gripping action holds, starts, and drives slotted screws in awkward, hard-to-reach
Adjustable Wrench
Fits various nut and bolt sizes with its adjustable jaw.
WYPALL L40 Towels, Dry Up Towels, 19-1/2 in. x 42 in., White, 200 Towels/Roll KCC05860
WYPALL L40 Wipers are effective wipers that absorb liquids lightning-fast. These wipes are made of bonded cellulose using DRC (double re-creped) technology for strength, softness and absorbency. As a wiping cloth, it soaks up liquids fast, but all you'll feel is softness, thanks to a plush, touchable outer layer. In fact, it's a popular choice for patient wiping in healthcare industries, for bathing and patient drying. These utility wipes are specially designed to absorb liquids, lubricants and oils (in restaurants for wiping counters, in mechanic shops, industrial and commercial factories and more), yet they're soft enough for use on face and hands. Experience the difference in superior absorbency and cleaning at your home or office today. Towel/Wipe Type: Dry Wipes; Application: Bathrooms; Material(s): Cloth-Like; Number of Plies: 1.
Steps

Preparation and Safety
10 minsThe first and most critical step is to ensure the work area is safe. Go to your home's main electrical panel and turn off the circuit breaker that powers the dishwasher. Then, locate the hot water shutoff valve under the kitchen sink, which supplies the dishwasher, and turn it fully to the 'off' position. Lay down several old towels in front of the dishwasher and under the sink to absorb any residual water that will spill during disconnection.

Disconnect Plumbing Lines
20 minsUnder the sink, place a small bucket to catch water from the hoses. First, disconnect the drain hose, which is typically connected to a nipple on the garbage disposal or a wye-tailpiece on the sink drain. Use a flathead screwdriver or nut driver to loosen the hose clamp, then pull the hose off the nipple. Next, disconnect the water supply line. Use an adjustable wrench to loosen the compression nut connecting the supply line to the hot water shutoff valve. Have towels ready as water will drain from the line. Finally, disconnect the other end of the supply line from the dishwasher's inlet valve, which is usually at the front, behind a lower access panel.

Remove Old Dishwasher
15 minsAfter all lines (plumbing and electrical) are disconnected, the old unit can be removed. Open the dishwasher door and look for two mounting brackets that secure the top of the dishwasher to the underside of the countertop. Use a screwdriver to remove these screws. With the screws removed, you can now carefully slide the old dishwasher straight out of the cabinet opening. You may need to adjust the front leveling feet downwards (counter-clockwise) to create enough clearance.

Prepare New Dishwasher Fittings
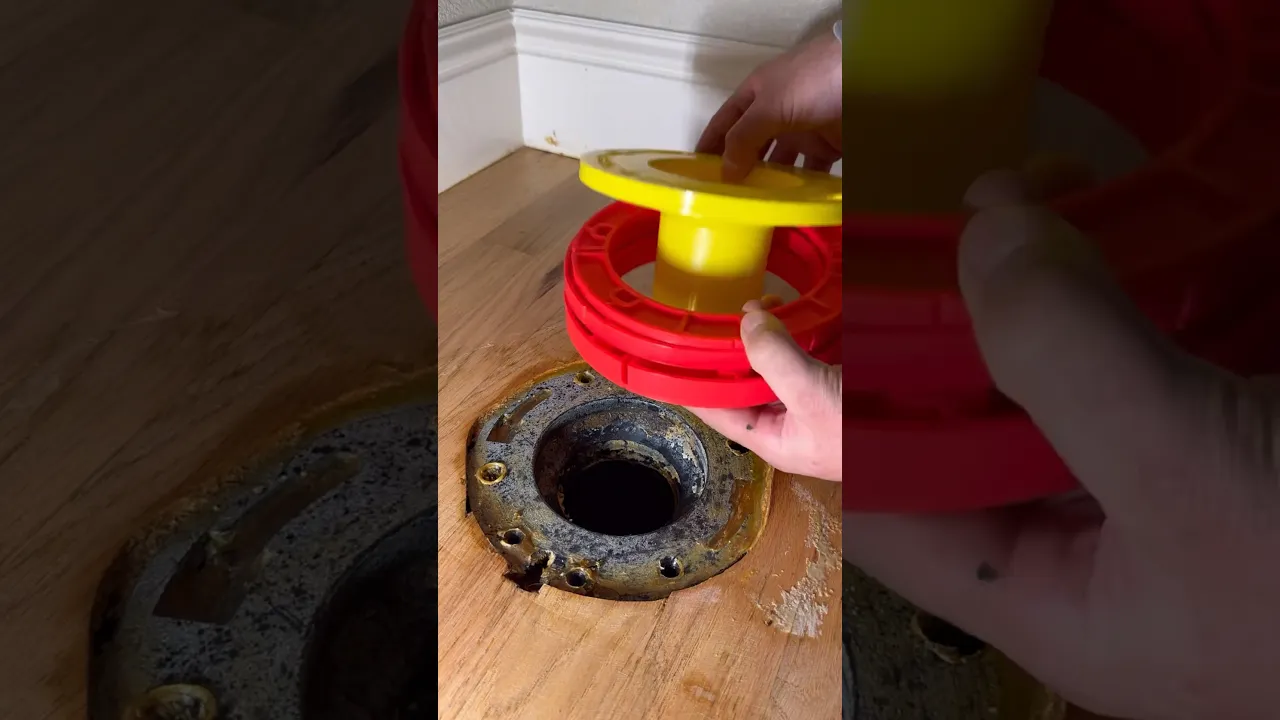
15 minsPrepare the new dishwasher for installation before sliding it into place. Carefully tip the new unit onto its back on a piece of cardboard to protect it. Locate the water inlet valve. Wrap the male threads of a new 90-degree brass elbow fitting with 3-4 layers of Teflon tape in a clockwise direction. Screw this fitting into the dishwasher's plastic inlet valve, hand-tightening first and then giving it a gentle quarter-turn with a wrench. Do not over-tighten, as this can crack the plastic housing. Orient the elbow to point towards the rear of the dishwasher, where the water line will connect.

Position and Level New Dishwasher
20 minsCarefully slide the new dishwasher part-way into the cabinet opening. Before pushing it all the way in, feed the drain hose, the new water supply line, and the electrical cable through the access hole in the side of the cabinet into the sink base. Once the lines are through, push the dishwasher the rest of the way in. Use a level on the top edge of the inner door to check for levelness side-to-side and front-to-back. Adjust the dishwasher's feet with an adjustable wrench until it is level and fits snugly beneath the countertop.

Connect Water Supply Line
15 minsConnect the new braided water supply line to the 90-degree elbow you installed on the dishwasher. Hand-tighten the coupling, then give it a final quarter-turn with a wrench. Route the other end to the hot water shutoff valve under the sink. Attach the line to the valve, ensuring the threads are aligned correctly to prevent cross-threading. Tighten the nut with an adjustable wrench until it is snug. If connecting to a copper pipe shutoff, use a second wrench to hold the valve body steady to prevent twisting and breaking the pipe.

Connect Drain Hose
15 minsRoute the new drain hose from the dishwasher to the garbage disposal's inlet nipple. To prevent contaminated water from the sink from flowing back into the clean dishwasher, create a 'high loop' with the hose. Secure the drain hose as high as possible against the underside of the countertop or the back wall of the sink cabinet before it loops down to the disposal nipple. Use a strap or zip tie to hold it in place. Slide the spring clamp or hose clamp over the end of the hose, push the hose firmly onto the nipple, and move the clamp into position to secure it tightly.

Check for Leaks
15 minsWith all plumbing connections made, it's time to test for leaks before finishing the installation. Place a dry paper towel under the hot water shutoff valve and where the supply line connects to the dishwasher. Slowly turn the water shutoff valve all the way on. Use a flashlight to carefully inspect both connection points for any signs of dripping. If any moisture appears, turn the water off and tighten the leaking connection slightly. Once you confirm the supply side is dry, turn the power back on at the circuit breaker. Start a 'rinse only' or 'quick wash' cycle. As the dishwasher fills and then drains, check the supply and drain line connections again for any leaks.

Secure the Dishwasher
10 minsAfter confirming the dishwasher runs without any leaks, perform the final step. Open the dishwasher door and locate the mounting brackets at the top of the unit. Using the provided screws and a screwdriver or drill, fasten these brackets to the underside of the countertop. This secures the dishwasher in place, preventing it from tipping forward when the racks are loaded and pulled out. Finally, install the lower toe-kick panel at the base of the dishwasher, which usually snaps or screws into place.
Common Problems
Failure to unplug the device can result in serious injury or death from electric shock.
Solution: To avoid this issue: Be mindful of this warning and take appropriate precautions.
Dishwasher hose tears during installation.
Solution: If the dishwasher hose is stuck, you can gently pry it with a flathead screwdriver, but be careful not to tear the hose.
Water spills onto the floor when disconnecting dishwasher pipes.
Solution: Have a bucket or a pan ready underneath the pipes to catch any water that drains out when you disconnect them.
Significant water may still be in the drain hose and pump, so have towels ready.
Solution: To avoid this issue: Be mindful of this warning and take appropriate precautions.
Failure to unplug the unit can result in serious injury from electric shock.
Solution: To avoid this issue: Be mindful of this warning and take appropriate precautions.
Water damage from unexpected spills during hose disconnection.
Solution: Have a bucket or towel ready to catch any water that may spill from the hoses.
Make sure the power is turned off first.
Solution: To avoid this issue: Be mindful of this warning and take appropriate precautions.
Frequently Asked Questions
What are the most critical safety steps to take before starting to disconnect the old dishwasher?
Always turn off the water supply valve leading to the dishwasher and cut power at the circuit breaker first. This prevents potential leaks, electrical shocks, and damage while working with water lines and electrical connections.
What are the most common causes of leaks when connecting the hot water supply line and drain hose, and how can I prevent them?
Leaks often stem from improperly tightened connections or insufficient Teflon tape on threaded fittings. Ensure fittings are hand-tightened, then turn an additional 1/2 to 1 full turn with a wrench, and apply Teflon tape only to male threaded connections to create a watertight seal.
The project is listed as 'beginner' with an estimated 5 hours; is this realistic for someone with no plumbing experience, and what factors might extend the timeline?
While beginner-friendly, 5 hours is an estimate for straightforward installations. If you encounter seized fittings, rusted pipes, or need to adjust cabinetry, it could take longer. Having all tools and materials ready beforehand will help keep you on track.
Besides the listed tools, what other items should a beginner have on hand in case of unexpected issues during removal or installation?
A small shop-vac for unexpected spills is invaluable. Additionally, having a utility knife to cut the drain hose to length and possibly a basin wrench if the old water supply connection is in a very tight spot could save you a trip to the hardware store.
Why is creating a 'high loop' for the drain hose so important, and how do I properly secure it?
A high loop prevents dirty water from your sink or garbage disposal from flowing back into your clean dishwasher, preventing contamination and odors. Secure the highest point of the drain hose underneath your sink with a clamp or strap, ensuring it's above the drain connection.
After installation, if the dishwasher isn't draining or filling properly, what are the first few things I should check?
First, verify the water supply valve is fully open and the power is on. If not draining, ensure the high loop isn't kinked and that the drain hose plug (if connecting to a new garbage disposal) has been removed from the disposal's inlet.


